Thursday, December 31, 2009

New Stamp Release from In2stamps and a Chance to Win

Hello! Happy Thursday.

Sorry, I don't have a card for you today, but I have an announcement about the newest stamp releases from In2stamps. You can hop over directly to the In2stamps' posting to get the details, or you can read the same information below.

There are 9 brandnew incredible designs and here they are:

Baby Collection

Left to right: Here I Come!, Caterpillar Kisses, Just relax


Left to right: Angel Boy, Flower Girl, Here I Am!


Get Well Collection

Left to right: Flower Bunny, Getting Spoiled, Mommy's Caring


WOW, aren't they adorable? All these new stamps are now available at the In2stamps online store: http://www.in2stamps.com and very soon to several fine retail stores in Europe and the USA.

With the release of these new stamps, Wendy and Bruno are going to do a giveaway!!!
2 winners will receive 3 stamps of their choice out of the new Baby and/or Get Well Collection. How great is that?

Here 's what you need to do:

Post on your blog the new stamp releases (note: not only in the sidebar). It has to be a post! Of course, you can put them also in your sidebar.

Leave your name and blog address at the Mister Linky at the In2stamps blog.

Giveaway runs until January 14th. The winners will be picked and announced on the In2stamps blog on January 15th.

Good luck!

Monday, December 28, 2009

Warm Hearts

Hello!

I'm back from my Christmas break with this card. I did run out of time and have missed a few people with a Christmas card, sooo..... Winter cards instead are on their way. I hope they won't mind.

Hmmm.....I'm thinking I should start now on my next year's list...hee hee--what do you think? This is one of the winder cards.


I have created this card using Claudia's wonderful sketch that she has provided for the Friday Sketchers Christmas Blog Hop and Challenge.

This is a short posting. I'm going back to my craft table to catch up on a few other projects.

Thanks so much for visiting.


Stamps: Magnolia Cozy Tilda (I think), Sentiments from MSE clear stamp set Holiday Sentiments.
DP's: Coordinating paper from DCWV Holiday Stack collection.
Tools: Cuttlebug embossing folder Heart Blocks, Big Shot, Martha Stewart snowflake punches, large and small.


Wednesday, December 23, 2009

To you & yours

Hello!

I meant to post this earlier as I had the card done a few days ago. Sorry, but it's getting too close to Christmas and with one thing and another it kept getting postponed.

This card is featuring another one of In2stamps images. The adorable image is designed by Luc Vincent. I wanted to show that In2stamps stamps can be quite versatile.

Presents or gifts are synonymous to birthdays as well as Christmas. So, I've taken this image of Mice Happiness from the Birthday Collection and using Christmas colours, I've created a Christmas card. 'Tis the season after all...hee hee.

To make this a bit more christmasy, I've added glitter to the white trim of the girl mouse's apron and the polka dots of her dress, and also to the white fur trim of the doll's cap and its collar. I hope you can see that in the picture.

This Mice Happiness stamp for the Birthday Collection is available at the In2stamps online store.

Coming soon are the new 'Baby Collection' and 'Get Well Collection'. Ooh, how exciting!!

There's more!!! We are starting a monthly challenge blog in the new year. Details to follow, so be on the lookout for it!

And this is the perfect time to wish you and all you hold dear a Happy Christmas. Have fun, keep safe and look out for each other.

Other stamp: the sentiment is from a MSE clear-stamp set.
Designer Papers: from the DCWV Holiday Stack collection.
Tools: EK Success border punch. For the leaves and berries: McGill twig punch, EK Success leaf punch, circle hand punches.
Misc.: Recollections brads, the gold ribbon is from my stash box.

Sunday, December 20, 2009

Wishing you a Merry Christmas

Hello and a happy Sunday to you all! Do I have to mention that it's the last one before.....you know.....I guess not, LOL.

I have a good friend who I used to work with, but she has retired quite a while back and moved to the Island (that's Vancouver Island, not Hawaii, hee hee...). She has since adopted a dog as a pet. So I made this card for Shirley and Muffin--Shirley is the friend (duh!).

I created this card for Magnolia Down Under Challenge #29, our last challenge of the year. And this fortnight challenge is…Stamp with Another Use?!

This is a chance for you to be really creative and think outside the box--to take a Magnolia image/stamp and use it for something than what it was designed for. For example, our very talented DT member, Debbie, has taken an Easter Tilda image and she has made a baby card with it. And here I have taken the image of Tilda with Puppy (not sure which collection she is from) and used it to make a Christmas card. I've used the traditional Christmas colours and added a Santa's hat to Tilda's head. But please check out the creative geniuses of the other DT members at MDUC.

And this weeks sponsor is Magnolia Down Under *STORE* and the prize this fortnight is….

There are 3 prizes AND we will have this challenge up till January the 17th when we will be returning from a break… SO it’s giving you almost a full month to get your entries in to be in the running…..

1st Prize ONE of these….
2nd Prize $10 voucher…
3rd Prize ….. Lazy Summer Collection 12 sheets of 5.5″x5.5″

Aren't these prizes fab? Too bad, I can't enter this challenge myself....big sigh...
But hey, I can enter a couple of other challenges with this card instead:
At Simon Says Challenge, this week their theme is Merry Christmas.
At Stamp Something, they are having their Holiday Somethings challenge.

I've decorated the inside of my card with the Tilda image that I borrowed the hat from.

Enjoy the rest of your weekend. I hope you can find the time to relax a bit--if not before Christmas, then after.... A Happy Christmas to you and yours, and please, have a safe holiday season.

Stamps: Sentiment is from Plaid #47237 4-Christmas-sentiment rubber stamp wood block.
DP's: all from the DCWV Holiday Stack Collection.
Tools: Martha Stewart border punch, Marvy Uchida scallop circle punches, Coluzzle circle templateMcGill twig punch, EK Success leave punch, circle hand punches.

Sunday, December 13, 2009

"Tis the Season

Hello everyone. Happy Sunday!

I'm taking a moment to make this posting and then back to work. So this is going to be short and sweet. Just another Christmas card here.


I created this card for the following challenges:

I used this sketch from Mojo Monday Sketch Blog for their Week 116 challenge -- MOJO 116.

Challenge # 69 at Everybody-Art-Challenge has red and green as their theme.

This week's challenge at Just Magnolia is --It's Christmas.

At Charisma Cardz, for their Challenge #49, they have a colour combo challenge of RED, GREEN AND A CHOICE OF EITHER WHITE OR SILVER!

Okay, that is it!!! I did say this was going to be short. Enjoy the rest of your weekend!

Stamps: Magnolia Santa's Little Helper, Plaid #47237 four-holiday-sentiment rubber stamp.
DP's: all from the DCWV Holiday Stack Collection.
Tools: Marvy Uchida scallop circle punches, Coluzzle circle template.
Misc. : Kaiser Craft pearls, Vintage Attic Treasures pearls.


Saturday, December 12, 2009

Happy Birthday

Hello everyone!

I've taken a detour from my Christmas-card-making marathon...hee hee...and made this birthday card. This is my first DT card for In2stamps.

This cute stamp I am using is from In2stamps. This is called Surprise Cake from their newly-launched Birthday Collection. Isn't it adorable?!

In2stamps is the newest small stamp company based in Belgium. Their stamps can be purchased througout Europe and the US. Take a look at this store locator to see which retailers are selling their stamps. If you can't find a store near you or in your country, you can order them on-line directly from the In2stamps webstore. They ship worldwide!!!

Since this is my first attempt at coloring one of the mouse images, I wasn't too sure if I should go with a grey tone or a brown one. Decided to go with brown, but the particular shade of brown was a dilemma also. Well, I'm trying this one to see how it looks. Hmmm.... What do you think?

I'm keeping this short. Enjoy your weekend! We're expecting a few flurries here--the temperature is aroung the freezing mark. Brrr.....


Stamps: In2stamps Surprise Cake from the Birthday collection.
DP's: from DCWV Holiday Stack collection.
Tools: EK Success border punch candles, Spellbinders Nestabilities.
Misc.: Kaiser Craft pearls, Making Memories brads.


Sunday, December 06, 2009

Merry Christmas

Happy Sunday!

We got a break in the weather and it's sunny outside this morning. But brrr.....baby, it's cold outside! It was 3 degrees Celcius!!!

A new challenge at Magnolia Down Under--this is Challenge #28. Our theme is Bedazzled - "As they say Tis the Season and glitter, Bling, dazzling Diamonds, Stickles, charms, Rhinestones etc the list is endless go hand in hand. "

This weeks sponsor is Magnolia Down Under *STORE* and the prize this fortnight is the stamp for this adorable image of Christmas Eve Tilda.

I hope you will check out the creations of the other DT members at MDUC. And the details of their project can be found on their individual blogs.

I've chosen these non-traditional Christmas colours for my Christmas card because this card is part of a gift set. The colours here are to match the other items in the set.

I'm using this card as my entry into the following challenges:

The card-and-gift set is for my Mom, so it fits the theme for the Monthly Special Challenge at Just Magnolia Week 34 -- make a card for Someone Special.


I used this sketch provide for Lili of the Valley's Challenge 42. I've flipped the sketch over to its side.

The theme for Stamp With Fun Challenge 35 is Xmas.

The theme for Cute Card Thursday Challenge 89 - Swirly Girly!
The theme for Creative Card Crew Challenge 39 is Christmas.

The theme for Stamp Something is Glitzy Somethings
Here's a closeup to show off the glitz and glitters, etc.

I've applied glitters to the scallop edges of the circle, to Tilda's fur trim and to the falling snowflakes and swirls in the background. Added rhinestones to the orange swirls and the huge punched snowflake.

That's it! Lots to do, lots to do!!! Enjoy the rest of your weekend. Thanks for stopping by and thanks for all the lovely comments. I really, really do appreciate each and every one of them. They make my day.


This is the entire card and gift set for my Mom.


Stamps: Magnolia Silent Night Tilda.
DP's from Making Memories Autumn Splendor collection.
Tool: Martha Stewart Large Snowflake punch, EK Success Swirl punch.
Misc. : me&my BIG ideas Icon rhinestones, Mark Richards pearls.

Tutorial - Lantern Gift Box


There are lots and lots and lots of pictures here, so this is a very long posting.

Supplies required (beside your basic tools e.g. glue/scor-tape, etc.):
2 3-1/2"-square chipboards,
1 12"x12" cardstock,
2 clear acetate 2 7/8" x 5" (or 5 1/16" is better),
designer paper to decorate

These are the 3 templates. You can probably figure them out yourself as I've put details on them, but the following pictures and explanations might make it easier. I'm breaking this down into 3 parts.


PART 1 - THE BOX

Cut out two 3-1/2" square chipboards. You only need one for the box, the other one is for the lid.
Round the corners.

Cut out 4 designer-paper squares of the same size.

Glue to the top and bottom of each chipboard square.

Now for the walls of the box. Cut out 6" x 12" cardstock. The side of paper that's going to be the inside of the box should be face up now.

Score lines as indicated. DON'T draw the broken lines like I have. I've only done them so you can see where the score lines should go.
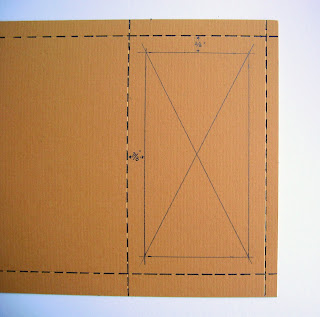
Horizontally at 2 15/16", 5 7/8", 8 13/16" and 11 3/4".
Vertically at 3/8" from the top and at 1/2" from the bottom.

Now to make the windows on 2 alternating sides of the box, draw a frame 3/8" from the score lines.

Draw diagonal lines from the corners of the frame.

Draw lines 1/8" away on both sides of each diagonal lines.

I've drawn heavy lines where now you should cut away with your craft knife.

Apply 1/4" scor-tape on the frame of the window.

Peel off the protective paper (or whatever you call it) and place the clear-acetate rectangles in place.

Apply 1/4" scor-tape along the top, peel off the paper and fold the top of the box toward you. This will double the strength of the top rim of the box.

Flip over so now the outside of the box is facing you. Apply 1/2" scor-tape along the bottom of the box. Apply 1/4" score-tape along the vertical edge of the box. Peel the protective paper off this and close the box by bringing the open edges together.

Cut the corners of the box to the score lines as shown.

Fold along the score lines.

Peel off the protective paper.

And center the box on top one of the chipboards. I actually prefer to use glue here as with the scor-tape you have to get it right the the first time. With glue, you have several seconds to reposition it if you're off centre.


I cut out a square piece of designer paper ( 2 7/8" square) to line the bottom of the box so it looks nicer.


PART 2 - THE LID

Score along the broken lines. And then cut along the lines that have been darken below. Discard the pieces that are marked with and 'x'.

Fold along score lines.

Apply 1/4" scor-tape along the outer edges.

Peel off the protective paper and form the little box for underneath the lid.

Center it on top of the second decorated chipboard.

This lid should fit snugly into the rim of the top of the box.


PART 3 - THE ROOF

This part took me the longest to do. I went through several revisions before I ended up with this one.

Cut out a 6"x6" piece of cardstock.

Score 1/2" from each of the 4 sides and score a one-inch square in the centre of the paper.

At each of the 4 corners, cut off a 1 1/2-inch square as shown below.


You should end up with this right now.

From the corner of the 1-inch square in the middle, score 3 diagonal lines to the points at the corner of the paper as shown above.

Then make the folds along the score lines. Look at the template for this one. As I indicated there, the middle diagonal line at each corner should be a valley fold. The rest of the lines are mountain folds. I should look like this now.

Flip over.
Apply glue as shown here and glue the corners together.

So, this is your roof. You just have to glue it on top of your lid now.

Apply glue.

And centre it on top of your lid.


Voila! Now you can decorate it anyway you want.

And this is how I ended up decorating my lantern gift box.


I am putting a pillar candle as a gift in the box, thus the sentiment to match.

See, this doesn't look so hard, does it? Now go and make your own gift box!!!

Related Posts Plugin for WordPress, Blogger...