Monday, October 11, 2010

Harvest Plenty

Happy Thanksgiving Day to all you (us) folks in Canada! Happy Columbus Day to you all south of the border! And to the rest, Happy Today!

I've put together this card to celebrate Thanksgiving.


I had the following challenges in mind when I was making this card:

Papertake Weekly is having their 3rd birthday blog hop and their challenge is to choose your favorite challenge from the past 3 years. I've chosen their September 8, 2008 Challenge - Autumn Haze.
Charisma Cardz - Challenge 40 - autumn colours.
Just Magnolia - Week 76 - 2 x 2 challenge, things in pairs. I have used 2 Tilda images, 2 designer papers, 2 sentiments.
Friday Sketchers - Challenge 123 - Bea's wonderful sketch. You can see her sketch on her blog here.
Stamping for the Weekend - Challenge 48 - autumn inspiration.


The 2 images from Magnolia is called Tilda Picking Peaches and Peachy Tilda. They are both from the A Little Yummy for Your Tummy Collection 2009. I thought the two images go well with the sentiments I wanted to use and they all fit the occasion perfectly. You can get these adorable Tildas from Diana from her on-line store, Magnolia-licious.
I have made this into a gate card to accommodate the 2 images and sentiments. They won't all fit on the front of the card!

I had coloured these 2 Tildas during my summer vacation. I was mindful of the weight I had to carry in my backpack, so what I had brought with me were a few markers to do the skintones--I like doing faces best with my markers--and a partial set of my Prismacolour pencils to colour the rest. These are 2 that I managed to get done. I thought I would have more time playing around with my Prismas, but as it turned out...not so much. Plus good lighting is very important, which was not always available.

That's it for now. Enjoy the rest of your day. Thanks so much for dropping by. I appreciate you taking the time to visit.


Stamps: Peachy Tilda, Tilda Picking Peaches and Peach Branch from Magnolia's A Little Yummy for Your Tummy Collection 2009, sentiments from Inkadinkadoo clear stamp set Harvest Expressions.
DP's: Chatterbox Scrapbook Walls Collection Tangerine Pinwheels, Recollections Monkeying Around Collection Banana Leaf.
Tools: Martha Stewart edge punch Woodland branch.
Embellishments: Recollections pearls.


Sunday, October 03, 2010

Hang a Shining Star...

Hello! Happy Sunday!

I really wasn't going to make another Christmas card so soon after the last one, but when I found my order from Magnolia-licious in my mailbox, I just couldn't wait to stamp and start colouring this Magnolia image of the oh, so adorable Star Tilda.


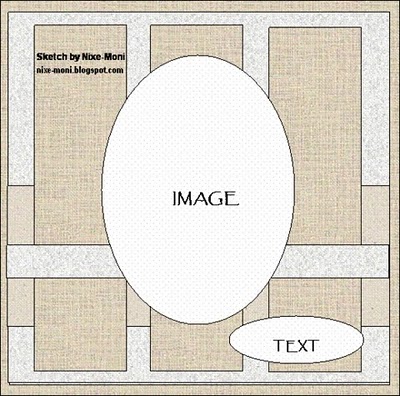
For the card, I've used Nixe-Moni's wonderful sketch pictured here that she created for the challenge at Bunny Zoe's Crafts.

This card is also for the following challenges:
Totally Tilda - Challenge # 6 - Glitter and Sparkle.
Diecut Dreams Christmas Club - Challenge 37 - Glitter Ribbons and Gems.
ABC Christmas Challenge - T is for Tree.
Charisma Cardz - Challenge # 39 - Christmas crafting.
Just Magnolia - Week 75 - Anything Goes.
Stamp Something Challenge - Something to Celebrate.
ABC Challenge - E is for Easel Card.
Secret Crafter Saturday Challenge # 103 - Easel Card.

Stamptacular Sunday Challenge #79 - Layer It On!


I took parts from the the lyrics of the Christmas song "Have Yourself a Merry Little Christmas" and use them as my sentiments. So...no stamps for these, both are computer generated.

I've actually used quite a bit of glitter on this card. I've outlined the edges of both the base DP squares with my glue stick pen and dipped them in glitter. All the star punchies are also covered with glitter. These pictures don't really show the effect of the glitter, but if you see this card in a dimmer light, it twinkles at you...LOL.

This card ended up being more colorful than I had planned. I usually choose the DP's that I want to use on my card first and then colour my image with the colours taken from the DP's. But this time, because I couldn't wait, I went ahead and colour my Tilda and ended up with yellow and green colour combo. Ooh...she's got freckles on her nose! So cute. So her image herself isn't too colourful, but I found this Bo Bunny paper and it just added a whole bunch of colours to the card.

I've been finishing my easel cards this way. By adding, to the top part of the inside of the card, a half-card panel to write my personal messages on and a Handmade 'logo'. And in fact, I've gone back to some of my older easel cards still in my collection and added these finishing touches as well.

Thanks so much for dropping by. I know your time is precious, so I appreciate the spare moment that you took for a visit. Have a wonderful and hopefully productive weekend.


Stamp: Magnolia Star Tilda from the A Merry Little Christmas 2010--available from Magnolia-licious.
DP's: Making Memories Spring Collection double-sided Brocade Spring, Bo Bunny's.
Tools: Martha Stewart border and corner punches Lattice, Spellbinders Nestabilities Labels Eight, EK Success star punches, Fiskars corner punch (for the small stars).
Miscellaneous: Tim Holtz distress ink pad Tea Dye, Sakura Quickie Glue stick pen, Jewel Glitter Ritz micro-fine glitter light gold, some shiny pearls/rhinestones and ribbon from my stash--don't know who makes them.

Saturday, September 25, 2010

I'm Dreaming of a White Christmas

Happy Saturday everyone!

Oh yeaay! It's the 25th of the month and time for another Christmas card. The Magnolia-licious Yahoo Group has a group called the Christmas All Year Long Group, and we are to create and post a Christmas card on the 25th of each month. I'm appreciating this group more and more now that we're getting closer and closer to Christmas (only 3 more months, people!) Because now when I look back, I see that I've got a number of Christmas cards in my collection already and I'm closer to my goal than I would be without this Group. So, thanks to Julie, who thought up the idea and organizes our group.

If you're taking part in this September blog hop and have come here from Monique's blog, then you are in the right place. And if you want to start, the beginning and a list of the participants is at the Christmas All Year Long Group's Blog here.

My card is what I like to call a white-on-white card. Except for the central image, everything is white. I have chosen this image of 'Bon Voyage Tilda' from the Magnolia Bon Voyage Collection 2010 as the focus of my card.


I have used 2 other Magnolia stamps to create the scene, 'Winter Night Background' from the Winter Collection 2008 (for the background scene) and 'Winter Forest' from the Santa Collection 2008 (for the 2 trees in front). Any of the Magnolia stamps can be purchased from Magnolia-licious on-line store and if Diana doesn't have it in stock, she will order it in for you.

I wanted to keep everything white, not even showing the black ink from the stamp pad. I stamped several images of each stamp on white cardstock and cut out all the little pieces. I turned the cutouts over so the stamped images were face down and then glued the pieces together to create the scene. Oh, I gave the little cutouts some curl to give a bit of added dimension to the picture. And then I added some micro-fine glitter here and there. So the final scene is a mirror image of the stamped image.


I am entering this card in a few challenges:
Colour Create - Challenge 54 - All White.
A Spoon Full of Sugar - Challenge 122 - Anything Goes.
Charisma Cardz - Challenge # 38 - Anything Goes!
Thanks for the taking the time to drop by. I appreciate your visit very much. Now, to continue with the blog hop, your next blog visit is at Peggie's.

Have a wonderful weekend! And if you haven't started on you Christmas cards yet, what are you waiting for? Get started!!! It's only 3 months away, you know...yikes!!!

Stamps: Magnolia Tilda from the Bon Voyage Collection 2010, Winter Night Background from the Winter Collection 2008, Winter Forest from the Santa Collection2008. The sentiment is computer generated.
Tools: Spellbinders Nestabilties Labels Two, McGill holly punch.
Miscellaneous: micro-fine glitter cool highlights, Mark Richards pearls.

Friday, September 17, 2010

A Foxy Lady

Hello!

I was in a Christmasy mood--yes, even as the fall season is just approaching...yikes, next week! But really, is it every tooo... early for a Christmas card? A matter of opinion I guess. Anyway, I've used this In2stamps image of Lady Petronella.


Thanks to Erin for the use of her sketch that she created for Sunday Sketch & Stamp Challenge #36.

The colour scheme of the card is to meet the Colour Create Challenge #53 - red, gold and white or cream.

And at Fussy and Fancy Friday Challenge, their theme is Christmas colours. I am hoping that that doesn't mean I have to actually use the tradional colours of red and green.


The original image of Lady Petronella actually has her holding a stem of flower in her left hand, but I didn't think that went well with the Christmas theme. So I did some work masking the flower from the stamped image.

Wherever I colour a touch of gold on the image, I overlay it with some gold micro-glitter. I also use the glitter to frame each piece of the DP's.


Yay...weekend coming up! Have a good one everyone! I'm always looking forward to weekends, especially on Mondays...LOL. Thanks for dropping by. I appreciate your visit very much. Take care!


Stamps: In2stamps Lady Petronella from the April Releases Collection (available from In2stamps on-line store here), PSX G3341 poinsettia, G Studio Holiday clear Stamp series 33.
DP: Creative Imaginations stripes, Making Memories Big Dot Rouge Paperie, Basic Grey Wassail Collection Cranberry Sauce, American Crafts dots.
Tools: Spellbinders Nestabilities Petite Ovals Large.
Misc: Vintage Attic Treasures pearls, Michaels pearls, ribbons from my stash.


Monday, September 13, 2010

Autumn Love

Helloooo.....

I bet you thought I've dropped off the edge of the earth...hee hee. Sorry for not having anything to be posted for a while now. Sigh...but life happens sometimes...LOL. Anyway, I finally have a new card to show you.

I wanted to make a card for the Play on Words theme for Cute Card Thursday's Challenge 129. I have this cute sentiment 'Falling for you' that I thought if I coupled it with a fall/autumn theme would fit the challenge.


I've used this wonderful Sketch of Dawny P. that she's created for Just Magnolia's Week 72 Challenge.

A few other challenges that I am entering with this card:

Totally Tilda - Challenge #5 - Make your own flowers. (See previous posting on info on the flower-making.)

Everybody-Art-Challenge - Challenge 107 - Handmade flowers.

Allsorts - Week 69 - Colours of Autumn


This is Tilda with Heart and she is from Magnolia's Pink Collection 2009. I am not actually completely done with this card, because I have not finished the inside. I have the perfect image to couple with this Tilda.

This is called Tilda in Autumn Leaves, but she is from the very very new Autumn 2010 Collection, so I am waiting for the stamp to come in the mail.
All Magnolia images can be purchased from Magnolia-licous. And if Diana doesn't have it in stock, she can order it in for you.

Thank you so much for sparing the time to drop by. I appreciate your visit. Enjoy your day!


Stamps: Magnolia Tilda with Heart (from the Pink Collection 2009) and Pumpkin (from the So Spooky 2009 Collection), sentiment 'Falling for you' from G Studio Clear stamp set Series 34.
DP's: Provo Craft Fluttery Things, We R Memory Keeper Lattice, Deja Views Shaorn Ann collection Red Oak.
Tools: Martha Stewart circle cutter, Punch Bunch leaf punch, EK Success retro flower punches--large, medium and small.
Misc: Studio G rhinestores, Recollections pearls.


Thursday, September 02, 2010

Sorry to see you go - card for Rebecca

Hello!

In the office where I work, there's a girl--her name is Rebecca--who's been helping us for the past year. She's been filling in for a colleague who went on maternity leave. Tomorrow will be Rebecca's last day with us, as my colleague is coming back. I wanted to give her a card, so I made this quick one for her.


I used this wonderful sketch of Alex that she has created for Challenge #66 at Everybody-Art-Challenge. As you can see, I've pretty much follow the layout.


Double Dutch is having what they call The Easy Challenge for their Challenge #51. You get to choose your favourite challenge from their DDC#1 through to DDC#50. Rebeccca's favorite colour is pink, so I had to have pink in the colour scheme. One of DDC's challenges fits the bill, DDC #24 -True Colours, which is to make a card with the colours pink, brown and cream.
Charisma Cardz's current challenge, their #35, is for the theme: Inspired by a Song! I think the song from the Sound of Music--I love that movie--So Long Farewell is just perfect for this.


This very adorable Magnolia image is called Goodbye Tilda. She is from the Bon Voyage 2010 Collection--you can get her from Magnolia-licious on-line store. The sentiment is computer generated.

DP: Memories Magenta Style Daisies, Hot Off the Press Paper Pizzazz Jacie's Vintage papers.
Tools: Spellbinders Nestabilities petite ovals small, Martha Stewart border punch lattice, Punch Bunch leaf punches, EK Success retro flower punches: large, medium and small.
Misc.: Making Memories brads, Darice pearls.


On another note......Oooooh, I've just got to show you this picture!!!


Look at these flowers! I spent an entire morning and part of the afternoon this past weekend making them. Aren't they gorgeous?


If you have the Magnolia Ink magazine #4, the Fun in the Summer Sun edition, you probably already know about this-flower tutorial that Johanna (Magnolia Sweden DT member) made. Have you tried it?


But I actually first saw this flower tutorial on YouTube, but yikes...it is all in Swedish. I think its from a Swedish scrapbooking TV program. But never mind, you don't really need to understand her to follow how she makes her flowers.

This is now my favorite way to make your-own-flowers--until something else comes up that is ...hee hee. This is way too cool--frigid...LOL.


Thanks for dropping by. I appreciate your visit. Enjoy your day.


Saturday, August 28, 2010

Autumn's coming!

Hello. Happy Saturday!

I am enjoying my summer, so I'm really so not ready for fall to come calling yet. But don't you just the colours of autumn? I sure do. Warm and rich colours and well...earthy...LOL. Here's a card I made in those colours!


I've created this card for Passion for Promarkers Challenge - Week 66, using Debs' sketch with the added theme autumn colours.

I am also entering this in the Papertake Weekly Challenge. Their current challenge is a 3-2-1 recipe challenge. The items are of your choice, so mine are 3 DP's, 2 flowers and 1 ribbon.

The image I used here is from In2stamps Elmit and Littlebell Collection. She is called Cute Littlebell. She can be purchased from In2stamps on-line store here.

That's it. A short and sweet posting for today. Thanks for taking the time to drop by for a visit. Appreciate it. Enjoy your weekend.


DP's: KC & Company Tim Coffey Fall Pumpkins and Fall Stripe, Provo Craft Fluttery Things.
Tools: Ek Success retro flower punches medium and small, Punch Bunch leaf punch, Martha Stewart twig punch.
Embellishments: Recollections Autumn pearls, ribbon from Michaels.

Promakers: blush, sunkissed pink, pastel pink, ivory, chesnut, henna, spice, burnt orange, honeycomb, apricot, olive green, moss, raw sienna, gold, mustard.

Friday, August 27, 2010

Flowers (side-view) - a very short tutorial

Hello.

I made these flowers for a card in a recent posting. Renkata asked me how I made them. And since I was going to show her how with this very short tutorial, I thought I might as well post it, in case anybody else is interested.


Anyway, I needed some flowers that I could make very quickly as I was running out of time. It was probably simpler if I used already-made bought flowers. However, if I don't make them myself, I feel terribly guilty because I have invested so much on those punches (yup, you're looking at a punch addict here...LOL) that I feel I have to make use of them. Besides, I love love love making my own flowers, although most of the time this is the most time-consuming part of my card-making.


This is of a very simple flower--viewed from the side...and it's very quick to do.

I thought I would just show you a picture of the steps that I have taken to make the flowers.


You just need 2 punches. These are the ones I used:

1. A leaf punch or something similar for the sepal. The one I used is a Martha Stewart leaf punch.
2. Any daisy-type flower punch. The one I used is a Fiskar one.


I think the picture is actually self-explanatory, but here are the steps anyway:
(The top row of flowers is for the flowers on my card.)

1. Punch the flower.
2. Fold in half. Curl the petals.
3. Fold again in half. Glue.
4. Glue on the sepal.

And you're done. How simple is that!


The bottow row of flowers is for a more open flower.
Make a cut to the center of the flower and instead of folding in half, fold in a third.


Have fun with this!
Enjoy your day!

Wednesday, August 25, 2010

Berry Christmas Tilda

Hello everyone!

Oh yes! Today's the 25th of the month! It's time to post another Christmas card for our Christmas All Year Long Group--this is for the August monthly blog hop. The Christmas group is part of Magnolia-licious Yahoo Group and to quote Julie who organizes it, "this group was created for Magnolia lovers who want to get a jump on the Christmas season by creating a Christmas card each month."

You can find a list of the participants and also the start of the blog hop at the Christmas Group's blog here.

If you're already following the blog hop and have arrive here from Monique's blog, then you are in the right place. And your next blog to visit, after mine, will be Robin's.


It seems like such a looong time since my last Christmas card, because I have missed posting a card last month as I was on vacation. I feel like I should make another one--soon-- just to make up for it...LOL. Anyway for the colour scheme of this card, I chose the traditional Christmas colours of red and green.


This Magnolia image I'm using is called Sweet Tilda from the Raising the Ceiling 2010 Collection. She's so adorable that I just want to hug her...LOL.
There are a few challenges that I am using this card to enter with:
Creative Inspirations Challenge 41 - Christmas in August.
Stamp with Fun Challenge 73 - Card for a girl.
7 Kids College Fund Challenge No. 2 - Strip it down, no more than 2 layers of DP.
I've put a different Tilda for the inside of my card.
This one is called Sparkling Tilda from the So Jolly & Under the Mistletoe 2009 Collection.


Thank you so much for taking the time to drop by. I appreciate the visit. Enjoy the rest of your week. Now, for your next Christmas card, hop over to Robin's blog.


Stamps: Magnolia Sweet Tilda and Sparkling Tilda, Rubber Stampede etched holly.
DP: from the Paper Company Holiday Paper Pack: red & green stripe, and green scroll.
Tools: EK Success scalloped scallops border punch, Spellbinders Nestabilities oval and scallop oval, Marvy Uchida scallop oval punch, Coluzzle oval template.
Misc.: Pearls from Michaels and Reflections, ribbon from Michaels.

Monday, August 23, 2010

Lady in Red

Hello!

I've made a birthday card for a very special lady. I hope she gets this in time for her birthday. I was cutting it very close to the wire--I probably...yikes...have not mailed it out soon enough for it to reach her before her birthday. Oh well... I hope she likes it anyway.


I have also made this card with the following challenges in mind:

All That Scraps Magnolia Challenge --Challenge #1 (new challenge, so this is for their very first challenge) - open theme.

Crafts and Me - Challenge 11 - petals and pearls.

Charizma Cards - Challenge 33 - die cuts.

Just Magnolia - Week 69 - let's get sentimental. I've put the sentiment in the inside of my card: The beauty within you brings joy to those around you.

Friday Sketchers - Challenge 116 - sketch by Beatrix. See her sketch on her blog here.

Magnolia-licious Highlites - Birthday celebration blog hop challenge.

Hmm...I'm not really sure if the shape of the die cut works with this sketch, but I so wanted to try it out and see how it looks on a card. This is a new die cut that I bought while I was on vacation this summer. I haven't seen that shape before.

I don't usually decorate the full pages of the inside of my cards. I normally only put something on half of the pages and left the other half blank to write my personal messages on. But this time I decided to do it differently.


Although I find all the Tildas adorable, I usually have a favorite or two from each collection. This one might just be it from the new Bon Voyage Collection.

Thanks so much for taking the time to drop by. I appreciate your visit very much. Enjoy your day and your week! myblog.

Stamps: Magnolia Tilda with Flowing Hair from the Hoppy Easter/Spring 2010 Collection, Magnolia Travelling Tilda from the Bon Voyage 2010 Collection,
DP's: Art Impressions cherry blossom, Mustard Moon old red tractor small plaid, Hot Off the Press Paper Pizzazz mixing masculine papers.
Tools: Nellie Snellen multi frame's die cut, Martha Stewart large circle cutter, Punch Bunch flower punches, Carl Carla Craft sun punch, EK Success retro flower small punch, Martha Stewart hydrangea smalll petals punch, McGill twig punch.
Misc.: Pearls from Recollections, Mark Richards and Vintage Attic Treasures.

Smell the Flowers

Hello!

I have a few cards that I have made for In2stamps before I left for my vacation, but didn't have the time to post them before I left. This is one of them. This card features Emily Sniffing Flower from the April Releases Collection. This is more or less a general card. I haven't added any sentiment to it. I'll probably use it as a birthday card. Or...I can use this as a retirement card and add the sentiment 'Now you have time to smell the roses/flowers...Happy Retirement!'


I am entering a few challenges with this card:
Everybody-Art-Challenge - Challenge 104 - In the garden
Stamping for the Weekend - Challenge 45 - Anything Goes
Crafty Creations - Challenge 81 - Butterflies


Thank you so much for taking the time to visit my blog.
Enjoy the rest of your weekend.


Stamps: In2stamps Emily Sniffing Flower (can be purchased from In2stamps on-line store here).
Designer Paper: from Provo Craft Super Slab 10 Spanish Forks paper pad.
Tools: EK Success border punch scallops with dots, Fiskars flower punch, Punch Bunch leaf punch, Martha Stewart butterfly punch.
Embellishments: Making Memories brads, Vintage Attic Treasures pearls.


Related Posts Plugin for WordPress, Blogger...