
Your basic swing card has a swing/centre panel that is usually either square or rectanglar. This tutorial is a for a swing card that has a shaped swing/centre panel. Please note that this is customized for a 'finished' 6-inch (15cm) square card, since that is my favorite card size. By 'finished' I mean when the card is folded up.
The shaped swing/centre panel can actually be created easily by cutting it out by hand using your kraft knife and/or scissor, but I am going to show you how to use your shape dies (eg. Spellbinders Nestabilities, Go Kreate dies, etc.) and your die-cutting machine (eg. Big Shot, Cuttlebug, etc.).
The card below (posted HERE previously) is the end result of this tutorial, so I am just going to list the steps to create this card.

Materials and Tools:
- 6" x 10" (15cm x 25cm) cardstock
- 5 7/8" x 9 7/8" (14.7cm x 24.7cm) designer paper (NOT designer cardstock--too thick)
- a shape die for the centre panel--this has to be less than 6" wide (your card size)
- die-cutting machine
- removable tape
- coloured images, sentiments, embellishments, etc. to decorate the card

For this card, I am using the Spellbinders Grand Labels Ten die--the 2nd smallest size in the set.
Step 1
On your cardstock, draw vertical lines with your pencil at 3 7/8" and 6 1/8" (9.7cm and 15.3cm).

Step 2
Take your designer paper and cut out your centre panel EXACTLY in centre with your die. I usually like to draw a criss cross on the paper to better centre the die. Put aside the die cut for decorating the swing panel later on.


Step 3
Apply glue to the back of your designer paper.
Step 4
Glue your designer paper in place onto your cardstock.

Step 5
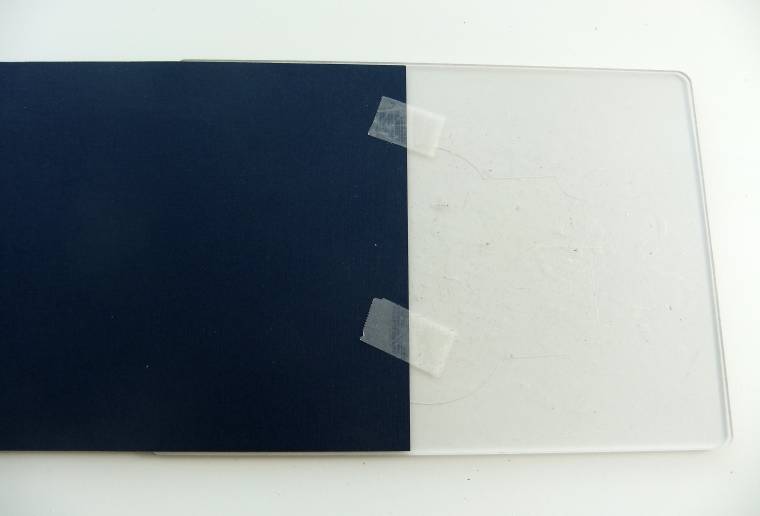
Reposition your die over the previously cut hole on the designer paper and tape in place with removable tape. Make sure this is really secure so it doesn't move when you run it through your die-cutting machine.

Step 6
Line up the edge of your cutting pad with one of the pencil-drawn lines.

Step 7
Secure the back of your card to the cutting pad with removable tape.
Step 8
Take your other cutting pad, place it underneath your card. Now your card is sandwiched between the 2 cutting pads.

Step 9
Run the 'sandwich' through your die-cutting machine--the one I am using here is the Big Shot Machine. Obviously...LOL.

Please note: This is how I do my die-cutting and NOT as per instructions that comes with the machine. Their instructions are to place the die first with the die blades facing up and then paper on top of that. My way is to place the paper first and then the die on top with the die blades facing down. I find that my cutting pad stays flat this way and do not curl up.
Step 10
You will see that now you have a partially cut shape like the picture below. Only the area of the die that was under the top cutting pad is cut--the rest is left untouched.
Repeat Steps 6 - 9 with the other side/end of you card.

Step 11
Place your card upside down on your scoreboard and score at 4" (10cm).

Step 12
Turn your card right side up and score at 6" (15cm).

Step 13
Mountain fold and valley fold along the score lines.

Step 14
Take the die cut that you have put aside and glue it in place as shown below.
Optional: I like to have a thin border around my die cuts, so I usually take my scissor and cut off about 1/16" all the way around the die cuts. Sorry, but yes, you have to do this by hand...sigh.

Step 15
And there you have the base of your card. Now you can finish decorating it with your coloured images, sentiments and embellishments.

Have fun with this and happy creating!!!

 |
| I did this one using the Spellbinders Grand Labels Four dies. |

23 comments:
Beautiful card - lovely flowers. Thank you very much for tutorial. I must try to do it.
Wspaniały pomysł, rewelacyjne wykonanie! SUPER!!!
Pozdrawiam MontanA
Mistrzostwo!! Przepiękna kartka. Pozdrawiam bardzo serdecznie
Thanks for this fab tutorial Norma, I will definitely be giving it a go, watch this space!
Hugs Nicola xxx
Thanks so much Norma for your tutorial, I will be giving this s try
Louise
Hello Norma! Thanks so much for this tutorial!! WOW I have to have this in my tutorial book. I wondered how you did the shaped swing card. (esp. with the layers) This is absolutley better than ice cream!!! Your cards are always soooooo GORGEOUS!!!!
Hugs, Cathy-Lynn
What a great tutorial of the swing card Norma.The
christmascard is such a beauty.I,m sure that I shall
use youre tutorial.
Thank you very much to share this with is.
Hugs Juanita
Wow, Norma - this is beautiful. Thanks for the great tutorial - I must try this technique.
Julie :o)
Thanx Norma for this wonderful tutorial, this card shape is so original! You're a very talented person, you've made another gorgeous creation.
Big thanx,
Lins x
Thank you for sharing this wonderful tutorial! I saw your card yesterday, and was so excited to learn that you would be teaching us how to do this. Your cards are beautiful!
Thanks for the tutorial. These shaped swing cards are much softer - perhaps due to he curves of the shape - than the regular rectangular ones I've seen. Have to try it some time.
Brilliant Tutorial as usual Norma, thank you once again for such fab inspiration.
Max x
Great Tutorial Norma I am off to give it a go wish me luck.
Hugs
Margaret M
wooww great tutorial, love this creation xx
Thanks for the great tutorial Norma. Your cards are amazing, I'm going to have a go at this one, hope it's as easy as your tutorial looks. :)
Thanks so much for sharing this, it is so simple, but we needed someone to show us how, love all your creations. You are so talented:)
Coucou!
J'adore cette carte et je suis très contente d'avoir trouvé le tuto chez toi.
je vais essayer de la faire !
Merci !
Coucou !
Cà y est : je l'ai faite et j'aime beaucoup !
Encore merci pour ce tuto.
Amicalement
Norma these tutorials are so wonderful and so informative I love them all. Am saving them and will use them. I can't wait to try some of them. Thanks for sharing.
Your cards are all beautiful. Your very talented!!
Beautiful! Something I am going to have to try. You make it seem so easy! :) Nancee
Love the card and great tutorial, thank you, Mascha
Awesome card, Norma! Again fabulous coloring. Thanks for the tutorial.
Karen
Thank you so much Norma!!
Post a Comment