Tuesday, August 14, 2012

Love is the Thread...- Magnolia-licious August Colour Challenge

Hello.

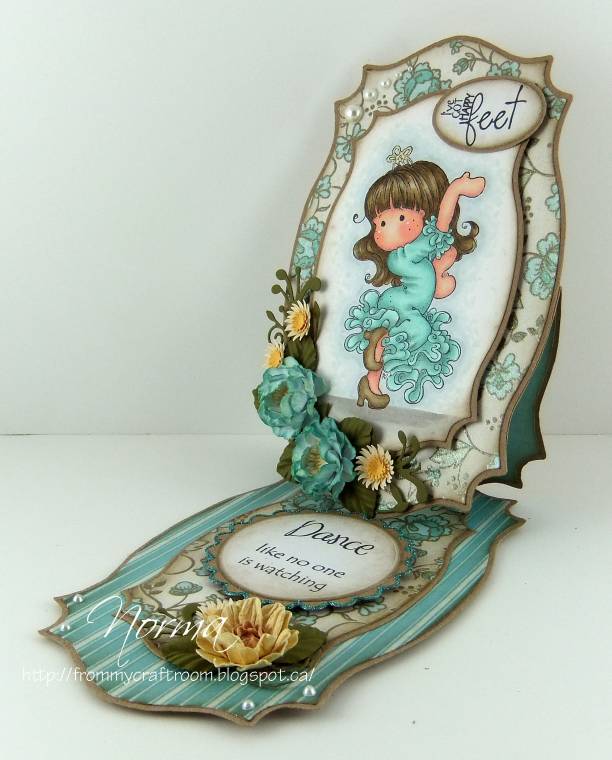
Just one day after yesterday...LOL and it's the 2nd Tuesday in August, so this time it's a new colour challenge at the Magnolia-licious Challenge Blog.  I love criss cross cards, so I made another one for the challenge. 


For this month, the very talented Jane is our hostess and for the challenge she has chosen the colours pink, aqua/blue and white/cream.


I hope you will play along with us in our challenge.  Have a look and see at the fabulous cards of my DT teammates for more inspirations, HERE.  As usual there is a $25 Gift Certificate from Magnolia-licious for one lucky winner chosen by random draw.

This is Tilda Makes a Blueberry Blanket (although it's really a raspberry blanket...LOL). I did a bit of masking and had Tilda sat on another image of Swedish Chair.


For the pocket that was formed by the criss-crossed sections of the card, I've made a pull-out tab to write a personal message on. 


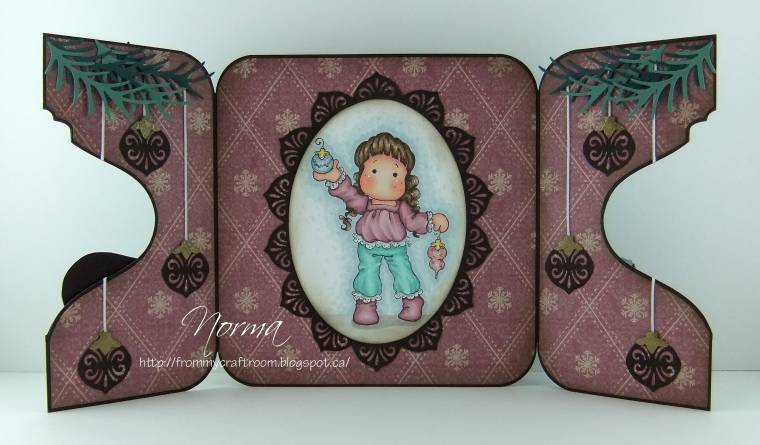
This image is of Tailor Tilda, which I thought was the perfect match for the one above.   The colouring of the images were done using alcohol-ink-based markers (list is below).


All of the 3 Magnolia stamps I used for this card are available from Magnolia-licious on-line store. Diana has a wonderful selection of both full-size and mini-size stamps.  Check out also her selections of dies--from Memory Box, PoppyStamps, Magnolia, Cheery Lynn and Marianne Design--and other crafting supplies. Beside the discounted prices, you also earn store credits for future purchases.  


I love my dies!!!  I adore this Memory Box one they called Chloe Stem--I used 3 diecuts to make the white bloom at the top more 3-dimensional.  The wings of the dragonfly (using another Memory Box die) are from white translucent vellum.  The pink flower was made using Crealis Creative Flower No.2 dies.  I used the Spellbinder Rose Creation dies for the aqua flower. 

Challenges for this card:
Lovely hAnglar or Sweet Magnolia Challenge #49 - Flowers
Crafty Catz Weekly Challenge #145 - Anything Goes
Simply Create Too Challenge #19 - Anything Goes
Dream Valley Challenge 38 - Die Cuts and punches

Thanks so much for stopping by.  I really do appreciate your visit. I look forward to reading your comments.  Have a fabulous week.  


Materials and Tools Used
DP's:  TPC Studio Little Lovin'; Little Yellow Bicycle Baby Safary Pink Floral; Basic Grey Euphoria Ferver
Dies:  Spellbinders Labels Eighteen; Petite Ovals, Fancy Tag Three and Rose Creations; Memory Box  Chloe Stem and Willow Dragonfly; PoppyStamps Lorelai Leaf; Crealis Creative Flowers No. 2
Punches:  Martha Stewart edge and corner punches; Nellie Snellen Extra Large Leaf and Rose Leaves Jumbo
Miscellaneous:  Tim Holtz distress ink stamp pad Walnut Stain; pearls from my stash
Medium:  Letraset Promarker and Tria markers, and a couple of Shin-han Touch markers 
- face and skin--blush, coral, soft peach, vanilla, oatmeal, pastel pink
- hair and socks--burnt sienna, caramel, sandstone 
- aqua colour--duck egg, cool aqua, 317-T, tea green
- pink colour--rose pink, blossom, Touch 196
- chair--umber, touch 102, cinnamon, tan
- sewing machine--Touch cool greys 2-7

Monday, August 13, 2012

A Fairy Hello - Sweet Stamping Pixies August Challenge

Hello.

It's already August's second monday, so it's time for a new challenge at the Sweet Stamping Pixies Challenge.   This month's challenge is a recipe challenge:  flowers, ribbons and die cuts.  Here's the card that came up with. 


I hope you will play along with us in our challenge.  We are being sponsored by Magnolia-licious this month.  Hop over to the Sweet Stamping Pixie Challenge blog HERE to have a look at the prize and the fabulous cards of my DT teammates to inspire you.

This oh-so-adorable fairy image is of Summer Flower Tilda.  She is from Magnolia's Summer Memories Collection 2012.


Those cute mushroom images are of Jolly Fungi from Magnolia's So Jolly & Under the Mistletoe Collection 2010.  I've used my markers to colour the images for this card--Letraset Promarkers and Trias.  I've added glitter to Tilda's wings...hmmm...of which I've done a poor job at it--a bit lumpy in some places...LOL.

I've decorated the inside of my card very simply.  I wanted to show off the super gorgeous designer paper and not cover up too much of it.


Magnolia stamps are available from Magnolia-licious on-line store.  Diana has both full-size and mini stamps.  If you don't see the image(s) you are looking for in stock, contact Diana and she will be more than happy to help you.  
Check out also her excellent selections of Memory Box and PoppyStamps dies, as well as those from Magnolia, Marianne Design and Cheery Lynn.

Challenges for this card:
Stampalot Challenge for August - Take flight!
Sweet Stampin' Challenge  - Things with wings
No Matter Which Challenges - Challenge #1 Anything Goes
Simon Says Stamps - Let's Play Bingo (punches, glitter, blooms)
Midweek Magnolias Week #23 - Use 2 dies/punches

Thank you so much for taking the time to stop by.  I'm very appreciative of your visit and your encouraging and lovely comments.  Have a wonderful week. 


Materials and Tools Used
DP:  from Recollections Habitat paper pad
Dies:  Spellbinders Labels Six; Memory Box Delicate Vine
Punches:  McGill Baby Blooms; Punch Bunch small Ash Leaf; Fiskars 3-in-1 corner punch Celestial; Michaels tiny star
Miscellaneous:  Coluzzle oval template; brads, pearls, ribbons and glitter from my stash


Tuesday, August 07, 2012

An Early Thanksgiving Peek-A-Boo Card

Hello. 

I've been glued to my TV watching the Olympic Games!!! My card-making have been slightly ignored...LOL.  Have finally managed to get this one done.  I've been working on it for several days.

This is a peek-a-boo card.  My first!!!  I saw Dawn's video tutorial on YouTube, HERE, for a smaller-sized card.  Using the same concept, I've been trying to create a 6" x 6" card.  Revising her measurements wasn't as easy as I thought.  I've attempted a card a few times--and discarded them...LOL--before I had one that I can show you.  This is how my card finally turned out.


I'm still not quite happy about it--specifically the size of my window.  I made the window a little bit too big than what I'm comfortable with--it's too close to the edge of the card.  I made the opening so wide because I didn't want to cut off the image.  In the future, I will choose narrower images.
This is Tilda With Corn from Magnolia's Turning Leaves Collection 2012


Magnolia stamps are available from Magnolia-licious on-line store.  Diana has both full-size and mini stamps.  Check out also the selection of cutting dies from Memory Box, PoppyStamps, Magnolia doohickey, Marianne Design and Cheery Lynn, as well as other crafting tools.

This peek-a-boo card is what I call a mechanical card.  As you open the card, the first image is replaced by second image.  This is how it works...


This is so cool.  I think this is going to be one of my fave type of cards.  A very fun card to play with--just opening and closing, opening and closing...LOL.

The card looks like this from the top.


To match the first Tilda image and in keeping with the harvest and/or Thanksgiving theme, this second image is just perfect.  This is Tilda With Carrots, also from the Turning Leaves Collection 2012.   Both of the images here were coloured with markers. 


I am going to make another peek-a-boo card, but this time with a narrower window. Will see how that works out--will be better, I think. 

Challenges for this card:
Tuesday Throwdown #110 - On The Move
Lovely hAnglar or Sweet Magnolia Challenge #49 - Flowers
No Matter Which Challenges #1 - Anything Goes 
Deep Ocean Challenge #31 - Anything Goes
Hooked on Crafts Challenge #23 - Let's Celebrate!
Going Grey With Scrap-Creations - Challenge "D" (for dies)
Paper Play Challenges '12Week31 - Layer It Up!
Challenge Up Your Life Challenge #75 - Everything Goes

Thanks so much for stopping by. I appreciate your visit very much. Thanks also for all your encouraging and sweet comments--I do so enjoy reading them.  Have a fabulous week!

Materials and Tools Used:
DP's: Magnolia Vintage Corn; one paper from K&Company Tim Coffey Halloween and Fall paper pad
Dies: Spellbinders Posy Patch and Holly Motifs; PoppyStamps Gentle Leaf
Punches:  EK Success medium Retro Flower and Circle; Punch Bunch medium and small Impatient Leaves; Nellie Snellen Extra Large Leaf 
Miscellaneous: Coluzzle Oval template; Fiskars deckled scissor; Tim Holtz distress ink stamp pad Walnut Stain; Pearls from my stash
Medium:  alcohol-ink-based markers from Letraset--Promarkers and Trias (sorry, but I didn't jot down the colours this time).


Sunday, July 29, 2012

Tilda With a Gift For You

Hello.  This is going to be a short posting.
Here's my latest card.  The base of the card is just the one layer...


and the top half of the card is folded back so the card can be put on display standing up. 


I am featuring this adorable image of Tilda With A Gift For You from Magnolia's Turning Leaves Collection 2012.  I have coloured her with my Letraset Promarker and Tria markers.   


Check out Diana's on-line store Magnolia-licious for this Tilda stamp and other full-size and mini-size stamps from Magnolia.  While you're there, have a look at the dies from Memory Box, PoppyStamps, Magnolia, Marianne Design and Cheery Lynn.  Prices are discounted and you earn a 2% store credit to be applied on future purchases.   

Challenges I am entering with this card:
Totally Gorjuss Challenge #142 - Pearls
Crafts and Me Challenge #94 - Anything Goes
Papertake Weekly Challenge - Make your own (handmade flowers)
Stamptacular Sunday Challenge #174 - Patterns Galore (use at least 3 DP's) 
Color Me Creative Challenge #48 - Anything Goes With A Girly Twist
Tilda's Town Challenge #11 - Name Your Technique (layering, ink-distressed paper edges)


Thanks so much for taking the time to drop by.  I really appreciate your visit.  Enjoy the rest of your weekend!


Materials and Tools Used:

DP's:  two papers from Recollections Graceful paper pad; one paper from DCVW Holiday Stack

Dies:  Spellbinders Grand Labels Twenty-Three, Classic Oval, Floral Ovals and Rose Creations; CC Designs Olive Branch.    

Punches:  Punch Bunch medium and small Daisy and large Impatient Leaf; EK Success Circle punch and small Retro Flower; Fiskars 3-in-1 Celestial corner punch; Michaels mini sun 

Miscellaneous:  Tim Holtz distress ink stamp pad Walnut Stain; pearls from my stash

Medium:  Letraset Promarker and Tria markers
- face and skin--blush, coral, soft peach, vanilla, oatmeal, pastel pink
- hair and shoes--umber, caramel, sandstone
- dress, socks and hair ribbon--shale, 694-T, 693-T, 692-T
- gift--563-T, 337-T, tea green, mustard, 121-T, 1205-T
- dotted background --5507-T, 5527-T   


Tuesday, July 24, 2012

I've got happy feet - Magnolia-licious July Inspiration Challenge

Hello.
Oh wow, it's the 4th Tuesday of July already--the month is just flying by, LOL--so it's time for our monthly inspiration challenge at the Magnolia-Licious Challenge Blog. Here's my DT card.


Suzan is the hostess for the month and she has chosen this picture for your inspiration.


I will hope you will play along with us in our challenge. Check out the fabulous cards of my DT teammates for more inspirations at the Magnolia-licious Challenge Blog, HERE.  There is also a prize for one lucky winner of $25 Gift Certificate to Magnolia-licious on-line store.


The 'I've got happy feet' sentiment is a digi freebie that I got from TLC (thanks so much).  The other sentiment at the base of the card is one I typed on my laptop.    

This image is of Tilda Learning To Dance--she's just oh-so-adorable!  She is from Magnolia's newest collection, Turning Leaves Collection 2012--I'm having so much fun with this collection!  I've used my collections of alcohol-inkmarkers to colour her.  I've added glitter to her tiara, but I don't think you can see it in the picture below.


Full-size and mini Magnolia stamps are available at Magnolia-licious, Diana's on-line store. She also has a fabulous collection of cutting dies from Memory Box, PoppyStamps, Magnolia, Marianne Design and Cheery Lynn.  Her prices are discounted!!  And as a bonus, you also earn a 2% credit that you can use on future purchases.  Sweet! 


Challenges for this card:
I ♥ ProMarkers Challenge #126 - Sparkle (on her tiara and on the scalloped border of the sentiment at the  bottom) 
Tilda's Town Challenge #10 - Anything Goes
Card Makin' Mamas Challenge #50 - 1 image, 2 DP's, 3 embellishments
Colour Me Creative Challenge #48 - Anything Goes with a Girly Twist
Stamptacular Sunday Challenge #173 - To DIE for!
Papertake Weekly Challenge - Make Your Own (handmade flowers)

Thanks so much for taking the time to drop by.  Much appreciate your visit and your lovely and encouraging  comments--I love reading them. Have a fabulous week!!!  


Materials and Tools Used: 

DP's:  from DCWV Linen Closet paper pad

Dies:  Spellbinders Labels Twenty-Five, Standard Circle and Scalloped Circles; Memory Box Honeysuckle Vine

Punches: Punch Bunch Impatient Leaf; Carl Kraft Sun; EK Success medium Retro Flower; Fiskars 3-in-1 corner punch Celestial; Michaels mini sun

Miscellaneous:  Coluzzle oval templates, Tim Holtz distress ink stamp pads Frayed Burlap and Broken China

Medium:  Letraset Promarkers and Letraset Trias 
- face and skin--blush, coral, soft peach, vanilla, oatmeal, pastel pink 
- hair and shoes--umber, burnt sienna, caramel, sandstone
- dress--563-T, 333-T, pastel green, soft green
- tiara--141-T, 121-T, 120-T
--background--5527-T, 5507-T

Thursday, July 19, 2012

You Are So Special

Hello.

Woo-hoo, my stamps from the new Magnolia's latest collection, the Turning Leaves Collection 2012, came in the mail and I couldn't wait to start stamping and colouring.  Here's a card that I just finished.


I just luvvvv...autumn colours, don't you? This as you can see is a side-step card.


I find this Tilda image oh-so-adorable.  She is called Autumn Tilda With Broom.  The 'you are so special' sentiment is also from Magnolia and it is from the--what else?--You Are So Special collection 2011.  
I have used my Letraset Promakers and Trias, and a few Shin-Han Touch markers to do the colouring.  


This and other Magnolia stamps--both full-size and mini-size are available from Magnolia-licious on-line store. Check out the selection of cutting dies available there too--from Memory Box, PoppyStamps, Magnolia, Marianne Design and Cheery Lynn--prices are discounted and as a bonus you earn 2% store credit to be used on future purchases!

This is what the card looks like when laid out flat on the table.


Challenges that I am entering with this card:  
Marianne's Design Divas - Anything Goes (Marianne Design dies used:  LR0111, LR0112, LR0117, LR0133, LR0192)
Magnolia Stamp Lover - Sugar Challenge (use Tilda)
Totally Tilda Challenge #51 - Tilda plus a Magnolia sentiment
Lovely hAnglar or SweetMagnolia - Challenge #47 – Anything Goes
Addicted to Stamps Challenge #34 – Card for Someone Special
ABC Challenges - T for Two (I used 2 designer papers)
Let's Ink It Up Challenge #25 - All Girl (2nd entry)


The flowers and foliage here were all made using Marianne Design Creatables dies--see list below. 


Thanks for taking the time to drop by.  Your visit is always very much appreciated.  Grateful for your comments as well, 'cause I love reading them.  Have a wonderful day! 


Materials and Tools Used:

DP's:  Imaginisce Apple Cider; Recollections Batiked My Interest Mango 

Dies:  Marianne Design Creatable Scalloped Circle Frame LR 0112, Flowers and Flower Centre LR0111, Leaves from Open Flower-Classic LR0133, Leaf from LR0117,  Leaf from LR0192; Spellbinders Grand Labels Twenty-Three, Classic Ovals

Miscellaneous:  Coluzzle circle template; Tim Holtz distress ink stamp pad Walnut Stain; pearls from my stash 

Medium:  Letraset Promarkers and Trias, Shin-Han Touch markers
- face and skin--blush, coral, soft peach, vanilla, oatmeal, pastel pink
- hair & boots--cinnamon, tan, Touch 99 and 102
- scarf--raw sienna, mustard, pastel yellow, Touch 141
- sweater--terra cotta, spice, honeycomb, apricot
- pants--olive green, 5767-T, 617-T, Touch 42
- broom--burnt sienna, caramel, sandstone, Touch 100
- falling leaves--burnt orance, olive green, mustard


Friday, July 13, 2012

A Christmas Gate-Fold with Window Card

Hello!

Okee-dockey...finally!   Here's the finished card of the tutorial I did a few postings ago (here).


I've added some glitter to the ornaments that Tilda has in her hands.  I used a border punch to border my oval panel (tutorial here) and to make the hanging ornaments.  This adorable image is of Tilda Hanging Ornaments from Magnolia's Merry Little Christmas Collection 2010.  And I used my markers to do the colouring.


Check out Diana's on-line store Magnolia-licious for both full-size and mini-size Magnolia stamps.  She also has a fabulous collection of cutting dies from Memory Box, PoppyStamps, Magnolia, Marianne Design and Cheery Lynn.  The prices are discounted and for a bonus you also get 2% credit that you can use on future purchases.  How cool is that! 

Challenges for this card: 
Hooked on Craft Challenge #22 - Christmas in July
Magnolia-Mania Challenge #50 - Merry Christmas
Divas By Design Challenge #43 - Christmas in July
Crafty Creations Challenge #178 - Free For All
Little Red Wagon Challenge #141 - Christmas in July
Crafty Sentiments Designs Challenge - Christmas in July
Shopping Our Stash Challenge #59 - Extra Fold or Pleats
Twisted Tuesday Challenges - 2TC14 A Holiday Pick 2! (Christmas, twine and die cuts)
Whoopsiedaisy Challenge - Make Your Own Embellishments
Christmas Cards All Year 'Round - Christmas Flowers/Holly

That's it for now.  Thanks so much for stopping by.  Appreciate the visit.  Have a wonderful weekend. 

  
Materials and Tools Used: 

DP's:  one paper from each of American Craft pattern papers Jolly and Recollections the Ballet paper pad

Dies:  Spellbinders 2011 Heirloom Ormnaments, Classic Ovals and Bitty Blossoms ; Magnolia Poinsettia Doohickey; Cheery Lynn Pine Branches; Memory Box Holly Vine and Cherry Blossom flower centre 

Punches: EK Success border punch (sorry, don't know the name right now--have to research)

Miscellaneous: Tim Holtz distress ink stamp pad Walnut Stain; pearls, string and glitter from my stash


Medium:  Letraset Promarkers and Pantone Tria markers
- face and skin—blush, coral, soft peach, vanilla, oatmeal, pastel pink
- hair—umber, cinnamon, tan
- blouse and socks--shale, 694-T, 693-T, 698-T 
- pants--563-T, 337-T, 331-T, pastel green

A very short tutorial - thin border to frame your DP's

You probably have noticed that I always have a thin border framing the designer papers on my cards.  Quite a number of people have asked me how I create the border--which surprised me because I thought everybody knew how to do this already.  I guess I've been doing it for so long that I don't think about it anymore...LOL...and forget that not everyone is in the same boat. 

Simply put...it's just a matter of having your designer paper slightly smaller than your background cardstock, approximately 1/8" (or 2 to 3mm smaller).

And ladies, I do this the hard way...LOL...by using my small scissor and do the cutting by hand.  It's time consuming, but I do like how it makes the cards look, so I think it's worth doing the extra work.
Straight edges are easy to do--you can use your kraft knife and a ruler.  But for curves/shapes, you use your small scissor.

There are 2 ways of making the slightly smaller shapes:

1st Method.  
Pencil draw the inside edge of your die.  Then cut along the drawn line.


2nd Method
Cut and embossed using your die and die-cutting machine.  Then cut along the embossed outline. 


If you want an even thinner border, say 1/16", then cut somewhere between the outside edge and the pencil-drawn/embossed line.

Once you've done this hundreds of time...hee hee, you get to be good at judging the border width that you won't need to make the pencil/embossed lines anymore--at least that's how it is with me.  

I like to ink distress my edges first before glueing/attaching the shaped DP onto the shaped cardstock.


The only time I get a break from having to handcut and am able to use my dies is when I do plain and scallopped circles and ovals.  I can use my Spellbinders dies then, because they do make them in 1/8" increments.

There you go!  Happy creating! 

Related Posts Plugin for WordPress, Blogger...