This is a tutorial on how to make a 'secret box' like the one I made in a previous posting here.
I needed a taller box to put larger images (of my fave Magnolia stamps) and taller trays for the larger Lindt Easter eggs (yum yum). So I have hightened the box 1 1/2 times to 4 1/2 inches high.
Materials
What you need for the box are 5 pieces of cardstock:
one - 6 inches x 10 1/2 inches (15.2 cm x 26.6 cm)
one - 7 inches x 10 1/2 inches (17.7 cm x 26.6 cm)
three - 5 5/8 inches x 5 5/8 inches (14.3 cm x 14.3 cm)
right side of the box
left side of the box
tray
If you have a knack at interpreting templates, then you can ignore the rest of the posting. However if you need step by step instructions, then keep on going...LOL. Warning--there are LOTS of pictures!
Step 1 - Place the 6" x 10 1/2" cardstock on your scoreboard with the short side along the top and score at 3".
Step 2 - Rotate the cardstock so the long side is along the top and score at 3" and 7 1/2".
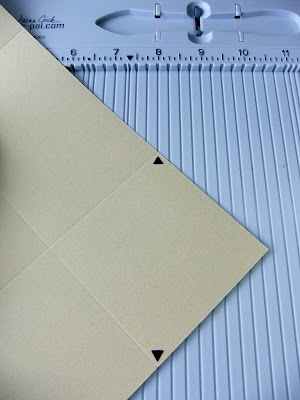
Step 3 - At one corner of the cardstock, score diagonally by lining up the corners (indicated by black arrows below) along one of the inch grid line on your scoreboard.
Step 4 - Score also at 1" away from the first scoreline. Do the same scorelines on the other corner of the cardstock at the same long side of the paper (indicated by the black arrows below).
Step 5 - Trim off the small corner triangle. Both corners.
Step 6 - Cut along the horizontal scoreline from the left vertical scoreline to the left side of the paper, and from the right vertical scoreline to the right side of the paper. (Refer to template.)
Step 7 - Cut diagonally at the corners that are unscored as show below.
Step 8 - Your cardstock should look like this now.
Step 9 - Valley fold along the scorelines.
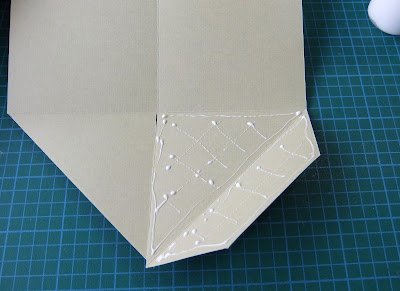
Step 10 - Apply glue all over the corner piece that has the flap as show below.
Step 11 - Tuck the opposite triangle in to form a corner.
Step 12 - Fold the flap up and over.
Step 13 - Do the same to the other end. You now have one side of a box.
Step 14 - Place the 7" x 10 1/2" cardstock on your scoreboard with the short side along the top and score at 3" and 6". That extra 1" of paper is for the connecting flap.
Step 15 - With this piece of cardstock do the same Step 2 to Step 7 above.
Step 16 - An extra cut line is required with this cardstock to trim off the corner to form the connecting flap.
Step 17 - This cardstock should look like this now.
Step 18 - Glue the same way as above --Step 10 to Step 12. Now you have the other side of the box.
Step 19 - Apply glue on the connecting flap as show below.
Step 20 - Attach the two side together
And there you have your box!
Step 21 - Take your 5 5/8" x 5 5/8" cardstock and place the left edge of the paper along the 3/4" scoreline on the Scor-Pal scoreboard. Score at 2 1/8" and 5".
Step 22 - Rotate the cardstock 90 degrees and do the same scoring lines.
Step 23 - Refer to template and cut along solid lines.
Step 24 - Fold along scorelines and apply glue as shown below.
Step 25 - Attach the sides together to form your tray.
Step 26 - For placement of the bottom tray inside the box, apply glue as shown below--to 2 sides of the tray and to the bottom of one side of the box.
Step 27 - For placement of the top and middle trays, apply glue to 2 sides of each tray as shown below
And there you have your completed secret box.
And then you can decorate your box any way you want. I am not quite finished with mine...LOL. It'll take me another day to do that. I'll edit and show the finished product when I'm done.
Edited
Here's the finished project!
Hope this tutorial will be of some use to some of you. Happy crafting!!!


59 comments:
Wow Norma - I love this secret box. Thanks so much for the Tutorial.
Hugs
Penni
X
Thanks for this wonderful tutorial!
Annette
Thank you so much for this tutorial, Norma! Now I must have it a go. :)
Hugs
C'est super original, j'aime beaucoup ! Merci pour ces explications.
Dziękuję za tuorial :)
Za chwilkę usiądę i zobaczymy co z tego wyjdzie .
Pozdrawiam cieplutko Mili
Thank you so much by the tutorial !!! I´m going to do it, if I can in my time !!! It´s cute and I love it !!
k, that's an excellently easy tutuorial to follow...great job. Oh and the box is pretty nice too :)
Laura
Thank you so much for the lovely Tutorial.
Hugs AStrid.
http://creaastrid.blogspot.com/
Hi Norma dear!
Thank you so much for this wonderful tutorial. Your instructions are so clear even I can follow them. I am going down the road to get some new cardstock to make it for my sister for Easter.
Hugs Maz
Thanks for sharing your instructions and templates.
Your secret box is beautiful!
Thank you for sharing, it's a great tutorial!
I'm so happy you made a tutorial for your fabulous box!! Thanks so much!!
Hola Norma ya hice la caja , pero tu tutorial es fantastico,todo muy bien explicado, un saludo MAGDA
What a great idea, thanks for sharing...
Wow! Thank you - I must try to do it!
It's marvelous box!!!!!!Thank you for tutorial!!!!!Love your works!!!
oh wow, it's a so gorgeous and amazing work! Thanks for this wonderful workshop!
XOXO Michi
Beautiful goft box and a fabulous tutorial Norma, thanks so much hunny for taking the time to put this together to share with us
hugs Mandy xx
NOrma, I was up to comment on your other box, and wanted to thankyou for this fabulous tutorial. thank you for sharing and taking time for all the nice pictures and explanations. I will certainly try my hand at this. Hugs.
Das ist eine wunderschöne Box, einfach fantastisch. Die werde ich auf jeden Fall ausprobieren!
Danke für die Anleitung.
Ich komme gerne her.
liebe Grüße aus Germany
Susanne
Thanks Norma for the tutorial I have printed it out and will make it.
Hugs harma
THANK YOU for taking the time to put this tutorial together. Thanks for all the photos you took!
What a detailed tutorial. Thanks for sharing! I finally have a cutting mat so might give this a try. And gorgeous handmade flowers, as usual.
Norma, all of your tutorials are wonderful! Thank you so much for sharing!
Fabulous. Thanks so much for sharing. It's stunning.
Brilliant tutorial, Thanks for the inspiration Hugs Julie x
Thank you very much Norma, It's so beautiful.
¡La cajita le quedó estupenda y el tutorial de maravilla!
Kait
http://simply-kait.blogspot.com/
Thank you for tutorial!!
Tank you for this tutorial. Wonderful little box. Your blog is full of marvelous things.
Amazing. Thanks so much for the wonderful tutorial. Pat K.x
Thanks for the tutorial, it was great! <3
Great!!!!
I love this secret box. Thanks so much for the Tutorial.
Beautiful secret box !
Love the design. Great !!
Many Thanks for sharing the tutorial.
Wow this is fab :) thanks for sharing,
You're blog is full of gorgeous things
Hugs Klair xx
Thank you Norma, Hope I can get this right. xxx
brilliant Norma, going to try this...errrr one day!! lol...on my to do list. Thanks for the brilliant tutorial.
Hugs
Tracey
Your boxes are wonderful!!!
Many thanks for the fantastic tutorial.
Hugs,
Marina
Thank you Norma.Your boxes are wonderful.
Urška
Thank you for this tutorial is a wonderful project that I will soon
Hugs
Oh my goodness, this is fantastic! Thank you so very much for all the hard work that went into sharing this with all of us. You as so much appreciated!!
XO Nana Rogers
Meraviglioso. Tks for your tutotial
That was fun ! Thank you for sharing :)
Me encanta. Asi que si me lo permites voy a realizar uno para mi escritorio, por lo que los papeles seran muy diferente. Te enseñare el resultado.
Saludos desde Sevillla (España)
So Sweet...Thanks for sharing it!
Thank you for sharing your tutorials and templates, they are really appreciated
Hi Norma. Fabulous box! I love it!
Have you the SVG file please? thanks
Hugs, xxx
I just made this box and the tutorial made it very easy. Thank you!
Hi! It's wonderfull!!
Amazing.. I like that so much...
Beautiful secret box, thanks for the Tutorial, excellent!
Hello and thank you for the great tutorial!!
You have make it so easy and my dother will be so happy with this gift for her friend's birthday, I'm now your new folower and will try everithing :)
Thank you again!!
♥Hugs Valentina♥
Goodmorning Norma! Thank you for your great tutorial... Beautiful Secret Box for my mom.
Hugs and kisses
Ilaria
JUST DISCOVERED THIS AND I LOVE IT. HAVE COPIED OFF YOUR TUTORIAL AND HOPE TO MAKE ONE. IT IS SO CUTE....THANK YOU FOR YOUR GENEROUS TUTORIAL.
BLESSINGS.......DIANE
Perfeito
Thank you - your instructions are incredibly clear and I really enjoyed making this stepper box.
Jill (New Zealand)
Hello! Thank you for sharing this instructions. As a bookbinder I am happy to see this idea. ...
I appriciate your effort for the step by step pic.instruction. It helped a lot. I tried this and came out really beautiful.your tutorial made it a lot easy.Thanks and keep sharing.
Regards,
Archana (India)
Es un fabuloso tutorial. Muchas gracias
Post a Comment