Saturday, December 04, 2010

Sending Christmas Hugs - Advent Calendar Box

Happy Saturday everyone!
(Not a long post, just lots of pictures--you'll get through this in next to no time...tee hee.)

I finally finished the advent I've been working on for a couple of weeks now. I could only manage to find a bit of free time here and there to work on it. I meant to finish this way before the end of November and have it shipped off to my friend so that she will have it by December 1, but as is almost always the case with me, I am late..... again!!! Hope she won't mind getting this a wee bit late. Anyway, this is the finished product.


When it's on display, it will look like this.


I've filled the drawers with just little things from the stash in my craft room.

On top of the box, is of course an easel card which I've glued on--my favorite type of card because it's an easy way to prop up the card and put it on display.

This adorable Magnolia image is Tilda wants a Hug...and when you look at here, you really do want to give her a hug...LOL. You can get her from Diana's online store Magnolia-licious.


The layout of the card is from this wonderful sketch of Domi's that she has created for Simon Says Challenge.

I am also using this advent calendar box as my entry into the following challenges:

Stamp With Fun Challenge #87 - Advent.

Passion for Promarkers Week #79 - Old and New. The old item would be the DP's which are from last year's collection which I bought during a clearance sale. The new item is the new Tilda stamp from this year's new Christmas collection.

7 Kids College Fund Challenge #9 - Non-Traditional Christmas Colours.

Cute Card Thursday Challenge #141- The Blues.

Fussy and Fancy Friday Challenge 26 - Anything But a Card!
ABC DT Challenge Blog - Non-Traditional Holiday Colour Challenge.


Here are pictures of the four sides of the box.


The inside of the easel card is decorated this way. The blank area is where I am going to write a personal Christmas message to my friend.

Thanks so much for dropping by. I appreciate your visit very much. And thank you for the lovely comments, for sparing a moment to write them--I appreciate them even more around this time of year as I know people are very very busy. Enjoy your weekend!


Stamps: Tilda Wants a Hugs from the Merry Little Christmas Collection 2010, Studio G clear stamp (good for 1 free hug coupon), Just Rite A Merry Little Christmas Set.
DP's: SEI Winter Song Paper Pad, SEI Addision Paper Pad.

Tools: Martha Stewart Punch Around the Page set French Scroll, Spellbinders Nestabilities Labels Fourteen, Marianne Design Creatables LR0112 (flourishes), EK Success retro flower punches medium and small, McGill Holly punch.

Misc.: Wooden buttons from Lee Valley Tools, Mark Richards pearls, Recollections brads, Tim Holtz distress ink pad Frayed Burlap, Mark Richards Peel Off's silver numbers.


Edited to include the following link:
If you're interested in making one of these advent calendar box, this one is based on a tutorial that Kirsten (from Norway) has on her blog for a box with 4 drawers.
So instead of just making 4 drawers, you will have to make 6 times that (a total of 24 drawers). And instead of just a one level box, you build a 6-level condo instead...LOL.
The base of Kirsten's box measures 6-inch square. The base of my box is actually 5 1/2 inches square, so I had to adjust her measurements. If you are going to follow Kirsten's tutorial (I have used it to make my first advent calendar box last year) there was a slight adjustment to one of the scoring lines for the drawer casing that I had to make. I found that the drawers fit better this way.
This is from Kirsten's tutorial:
This panel is 7 5/8 x 3 2/16 inches.
Score at 1 - 3 2/8 - 4 5/16 - 6 5/8.
I scored mine instead at 1 - 3 5/16 - 4 5/16 - 6 5/8.

Tuesday, November 30, 2010

Mini Easel Card Gift Box

Hello!

Oh dear, oh dear... it's the last day in November already!!! Sorry, but it'll probably be nothing but Christmasy things for me from now on until Christmas...and probably beyond that...LOL.


I’ve made this Christmas mini easel card (tutorial here) for a blogging friend. I also wanted to send her some little things to go with the card, so I’ve made a little gift box/drawer to put them in. Then I combined the two--glued the card on top of the box.

I used the Spellbinders Nestabilities Labels Four for my easel card this time.

I had initially created one of those 4-drawer boxes to go with this card. That box is 6 inches square. But when I centered the mini easel card on top of the box, the card looks sooo… miniscule in comparison. The card and the box were out of proportion—just didn’t look right. So I had to downsize the box. I played around with my Nesties and found that the largest size from the the Labels Eight die cuts would look just right for the base. Then I just made the box/drawer to fit.


This is my entry to the following challenges:

Paper Sundaes Challenge #46 - Adorn those corners.
Creative Inspirations Challenge #48 - Christmas Gift.
Charisma Cardz Challenge 47 - One for the Girls.
Stamping for the Weekend Challenge 51 - Winter.
Crafty Catz Challenge 60 - Christmas.
Die Cut Dreams Christmas Club Challenge 45 - Use a Diecut.


All the images here are from Magnolia. I chose this oldie but cutie Tilda with Wreath (from the Winter & Christmas Supplements 2007). I’ve had her for long time, but you know I actually can’t remember if I’ve ever coloured her before now. I’m ashamed to admit that I have several stamps that are like that—agh!!! I need more time to play with them all…LOL.

And in the background is my charlie brown christmas tree...hee hee...it's actual Fir in Snow from the So Jolly & Under the Mistletoe Collection 2009. You can purchase Magnolia images from Diana's online store Magnolia-licious. If the item you want isn't in stock, you can ask Diana to order it in for you.
I've added glitter to Tilda's wings, gloves and all the white trimmings of her hat and coat. Also used some white glue to add some snow to the tree branches and then sprinkled glitter on them too.


So, this is going out to a friend who I hope will be surprised to receive it. Not surprise of the card/gift box itself—'cause she’ll probably see this on my blog...LOL—but surprise that she’ll be the one getting it.

December tomorrow! Lots more to make and do!

Thanks for dropping by. I really appreciate your visit. And thanks ever so much to you who left me comments. I do so love reading them—they give me a boost whenever I'm feeling down. Enjoy your day!

Stamps: Magnolia Tilda with Wreath and Fir in Snow (available from Magnolia-licious on-line store). The sentiment is computer generated.

DP's: from SEI Wintersong Paper Pad.
Tools: Spellbinders Nestabilities Labels Four and Eight, Big Shot Machine, Cuttlebug Dies Vintage, Marvy Uchida Scallopped Oval Punch, Colluzle Oval Template.
Misc.: Recollections brad, wooden button/plug, Martha Stewart crystal fine glitter, Tim Holtz distress ink pad vintage photo .

Thursday, November 25, 2010

Dear Santa - November Christmas blog hop

Happy 25th of November!

Yikes! Already? Yeah!!! You know what it means...exactly one month before Christmas Day. It's also time for another Christmas card for the Christmas All Year Long Group and our November Blog Hop. The Christmas Group (thanks to Julie for organizing it) is part of the Magnolia-licious Yahoo Group (thanks to Deb also who is the owner of the Yahoo Group).

The start of the Blog Hop and also a list of the participants can be found at the Christmas Group's blog here.

If you are playing along and have arrived at my blog from Monique's, then you are in the right track. Your next stop from here will be at Peggie's blog.

So here's my last card for the Christmas Group this year. Yes, this is our last hop of the year--there won't be one in December.


Yes, this is another front panel side step card. I am loving this style of card. (Template for this is in a previous posting here, if you're interested.)

This was a card that I had created for the Magnolia Ink Magazine contest. The theme was to make a card with your best Christmas memory. I thought ‘writing a letter to Santa’ would be a fond Christmas memory. I cheated a bit here…tee hee…because I don’t actually remember ever writing a letter to Santa. I was brought up more on Sinterklass and Zwarte Piet. I do remember leaving grass in my shoes for Sinterklass' horse and hiding under the bed afraid that Zwarte Piet would take me away in his bag…LOL. What a hoot! Okay, enough reminiscing….


I am using this card for the following challenges:

Challenge Up Your Life Challenge #31 - St. Nicholas
Everybody-Art-Challenge #118 - Use shape
Cute Card Thursday Challenge #140 - Blast From the Past (Challenge # 103 - Dimensions)
Top Tip Tuesday Challenge #11 -Layer on Layer


The images I have used on this card are from Magnolia and they can purchased from Magnolia-licious on-line store. And if the item you want isn't in stock, please contact Diana and she will be happy to order it in for you.

On the front panel, I have the adorable Tilda Writing Diary sitting on the Santa Bench. And on the side panel, I have Santa Handing out Presents.

I have coloured Tilda and the Bench with my markers.

Santa, however, was actually coloured during my summer vacation when I was bumming around Europe with my Prismacolor pencils. So he is all done up with my Prismas. He looks like he is floating in air, but there’s actually a swirl design on the DP that I had him sitting on. You can probably have a better look on this flatten-card picture.


I won't bother showing the inside of the card, as I didn't do anything special there except to cover them up with designer paper.

Thanks for dropping by. I appreciate your visit. Have a wonderful day! And get busy with your own Christmas cards!!!


If you're following the Christmas blog hop, your next blog to visit is Peggie's.


Stamps: Tilda Writing Diary from Raising the Ceiling & Right Through My Heart Collection 2010, Santa Handing Out Presents and Santa Bench from the Santa Collection 2008. Ho Ho Ho sentiment from TPC Studio Christmas Expressions clear stamps.

DP's: from Me&My BIG Ideas Specialty Cardstock Pad Modern Milan.

Tools: Coluzzle Oval template.

Misc.: Recollections Autumn pearls, Vintage Attic Treasures pearls, Martha Stewart Crystal Fine Glitter


Tuesday, November 23, 2010

Baby It's Cold Outside!

Hello!

(I have changed the title of this posting because right now, it fits our weather to a T. Bbbrrrrr..... It fits my card too...LOL.)

Happy Tuesday! It's the 4th Tuesday of the month, so it's time for our Challenge #2 at the Magnolia-licious Challenge Blog. I had so much fun creating this card.


This is an inspirational challenge. You're to use this picture that Candy has chosen to inspire you to create something. This is going to be fun, fun, fun. I can’t wait to see what people will create. Everybody is going to have a different take from this picture...tee hee…it’s practically open theme!

I hope you will join us in our 2nd challenge. There's prize! Woo hoo..... This Mistletoe Doohickey is what you can win if your name is randomly drawn. (I want it too--wish I can enter the challenge myself...LOL.)


Now with me, when I first saw this picture, my eyes focused right away on the windows--go figure! My thoughts were: Hey, I can do a window card! And what would I see if I look out those windows? Is that weird or what!

I did have a few other ideas playing around in my head and I kept changing my mind, jumping from one idea to the next and then to the next, back and forth. But in the end I went with my first idea anyway.

I do a lot of my paper cutting the old fashion way--that's with a ruler, a pencil and a craft knife. Those are what I used to create the windows here.

I actually initially created doors instead of windows, you know like French doors, with the window panes going from top to bottom. But that didn't give me any blank space to write personal messages on, so I abandonned that card...ouch.

With this 'window' card, when I open the windows, I have a couple of clear spaces at the bottom to write more sentiments and messages.


For the inside of my card, I went with another type of card which I haven't done before. It's a frame card. I found a frame-card tutorial for it that Tanya has done for Stempeleinmaleins blog.


I've used 3 Magnolia stamp images here.

This is Snowie with Snowflake from the So Snowy Collection 2009. The Winter Fence and the Winter Forest are from the Santa Collection 2008.

Oh, and that adorable angel standing in front of the window is Tilda with Wreath and she is from the So Jolly & Under the Mistletoe 2009 Collection.
All these Magnolia stamps can, of course, be purchased from Diana's on-line store Magnolia-licious. If the stamp that you want (not just the ones that I used here, but ANY Maggie stamp) if it's not a stock item or the stamp is out of stock, then Diana will be more than happy order it in for you.

And if you have snow on your card, of course you must use glitter. Glitter glitter everywhere--on my card, on my craft table, on my craft room floor, on my clothing...and on me!!! LOL. No, seriously though, I've added glitter to the snow on the fence, the snow on the trees, the snow on the ground, on the snowflake that Snowie is holding, on the fur trim of Snowie's hat and his gloves; and also on Tilda's wings and headband.
I'm not sure if you can see the glitter very well here, even if you blow up the picture...oh, well.

I wanted to show the 3-D look of the scene in the frame card, so here's a side view.

Now, I am also going to use this card for the following challenges:

Creative Inspirations - Anything Christmassy/Winter.

ABC Christmas Challenge - X is for Xmas


Our Creative Corner - Create a Holiday 3-D project.

A Spoonfull of Sugar - Anything Goes

Stamps: All these Magnolia stamps that I used can be purchased from Magnolia-licious on-line store: Tilda with Jolly Wreath from the So Jolly & Under the Mistletoe Collection 2009, Snowie with Snowflake from the So Snowy Collection 2009, Winter Fence and Winter Forest from the Santa Collection 2008.Studio G Kolette Hall design Snowflakes, the sentiment is computer-generated.

DP's: hey, look at that, no DP used here!

Tools: McGill punch Holly, Martha Stewart border punch snowflakes (for the tiny snowflakes inside the card), Cuttlebug dies Vintage.
Misc.: Tim Holtz distress ink pad Frayed Burlap. I bought the metal clasp from a Lee Valley, a Canadian hardware store (and no, despite it having my last name, it’s not my store…don’t I wish!)
In case you're interested in the measurements for the window panes that I used for my window card, the template is below.

To the left here, is the card with the French doors that I decided not to use. The measurements for the window panes are below also.

Note: This only works for a 6-inches square cards--the majority of cards are of that size.

You can easily make your own--whatever fits the size of your card.

I drew them with pencil and then cut them out with my craft knife. I used clear acetate sheet for the glass, cut to fit.

Thanks for dropping by. I appreciate your visit. Sorry the posting is so lengthy.


Saturday, November 13, 2010

Winter Latern and Guest DT

Hello!

I am late with this posting (I should have done this on Saturday...LOL) because it took me this long to finish this lantern gift box.

Woo hoo... I am Guest DT at Stempeleinmaleins, a German on-line magazine. They are featuring my Lantern Gift Box Tutorial that I did last year.

I was very flattered when Jay Jay asked me and am sooo... excited. My tute is now in German...tee hee...how cool is that! Poor Jay Jay though, as she had to translate my imperial measurements to metric. But she must have done a fabulous job as the lanterns that the DT ladies created are...oh, you have got to see them...they are drop dead gorgeous--my jaw dropped. Seeing them was what made me want to make one too. And they gave me ideas as how I want to decorate mine. Such a talented Designer Team they have. Click here to see all their lanterns, but you have to scroll all the way to the end of the tutorial to see them.

Now that I've finished this project, I am using it as my entry into the following challenges:

Sir Stampalot Challenge for November - Christmas Traditions.
Bunny Zoe's Crafts Challenge #6 - Christmas...but not a card.
Cute Card Thursday Challenge #138 - Anything Goes
Die Cut Creams Christmas Club Challenge #41 - Snowflakes
Secret Crafters Saturday Challenge #109 - Sparkle and Shine
Paper Sundaes Challenge #44 - Pick Your Sundae Toppings!
(I've picked the colour blue and punches as my toppings.)

As there are 2 sides of the box to decorate, I have used a Tilda image on each. They are both from the Magnolia's new Merry Little Christmas Collection 2010: Tilda in Winter Light and Tilda with Fir. A third image, Winter Background from the Christmas 2008 Collection, was used for a background scene. You too can get these adorable Tildas and the scene images from Magnolia-licious on-line store, however if Diana doesn't have them in stock, they are surely on re-order.
I have used sooo... much glitter for this project--not that you can see very well in these pictures--that my craft room is a mess!!! Not to mention that I am myself covered in glitter...LOL. I'll have to put my vacuum to work...sigh.

Thanks so much for dropping by. Appreciate the visit.


Stamps: All from Magnolia: Tilda in Winter Light and Tilda with Fir from Merry Little Christmas Collection 2010, Winter Night Background from Winter Collection 2008 (available from Magnolia-licious).

DP's: From My Mind's Eye Playful Posies Short Stack with Glitter.

Tools: Martha Stewart edge punch (don't know the name for the one I used for the icicles) and snowflakes, Spellbinders Nestabilities Petite Ovals Large and Small, EK Success Snowflake.

Misc.: Tim Holtz distress ink pad Frayed Burlap, Martha Stewart Crystal Fine Glitter.

Tuesday, November 09, 2010

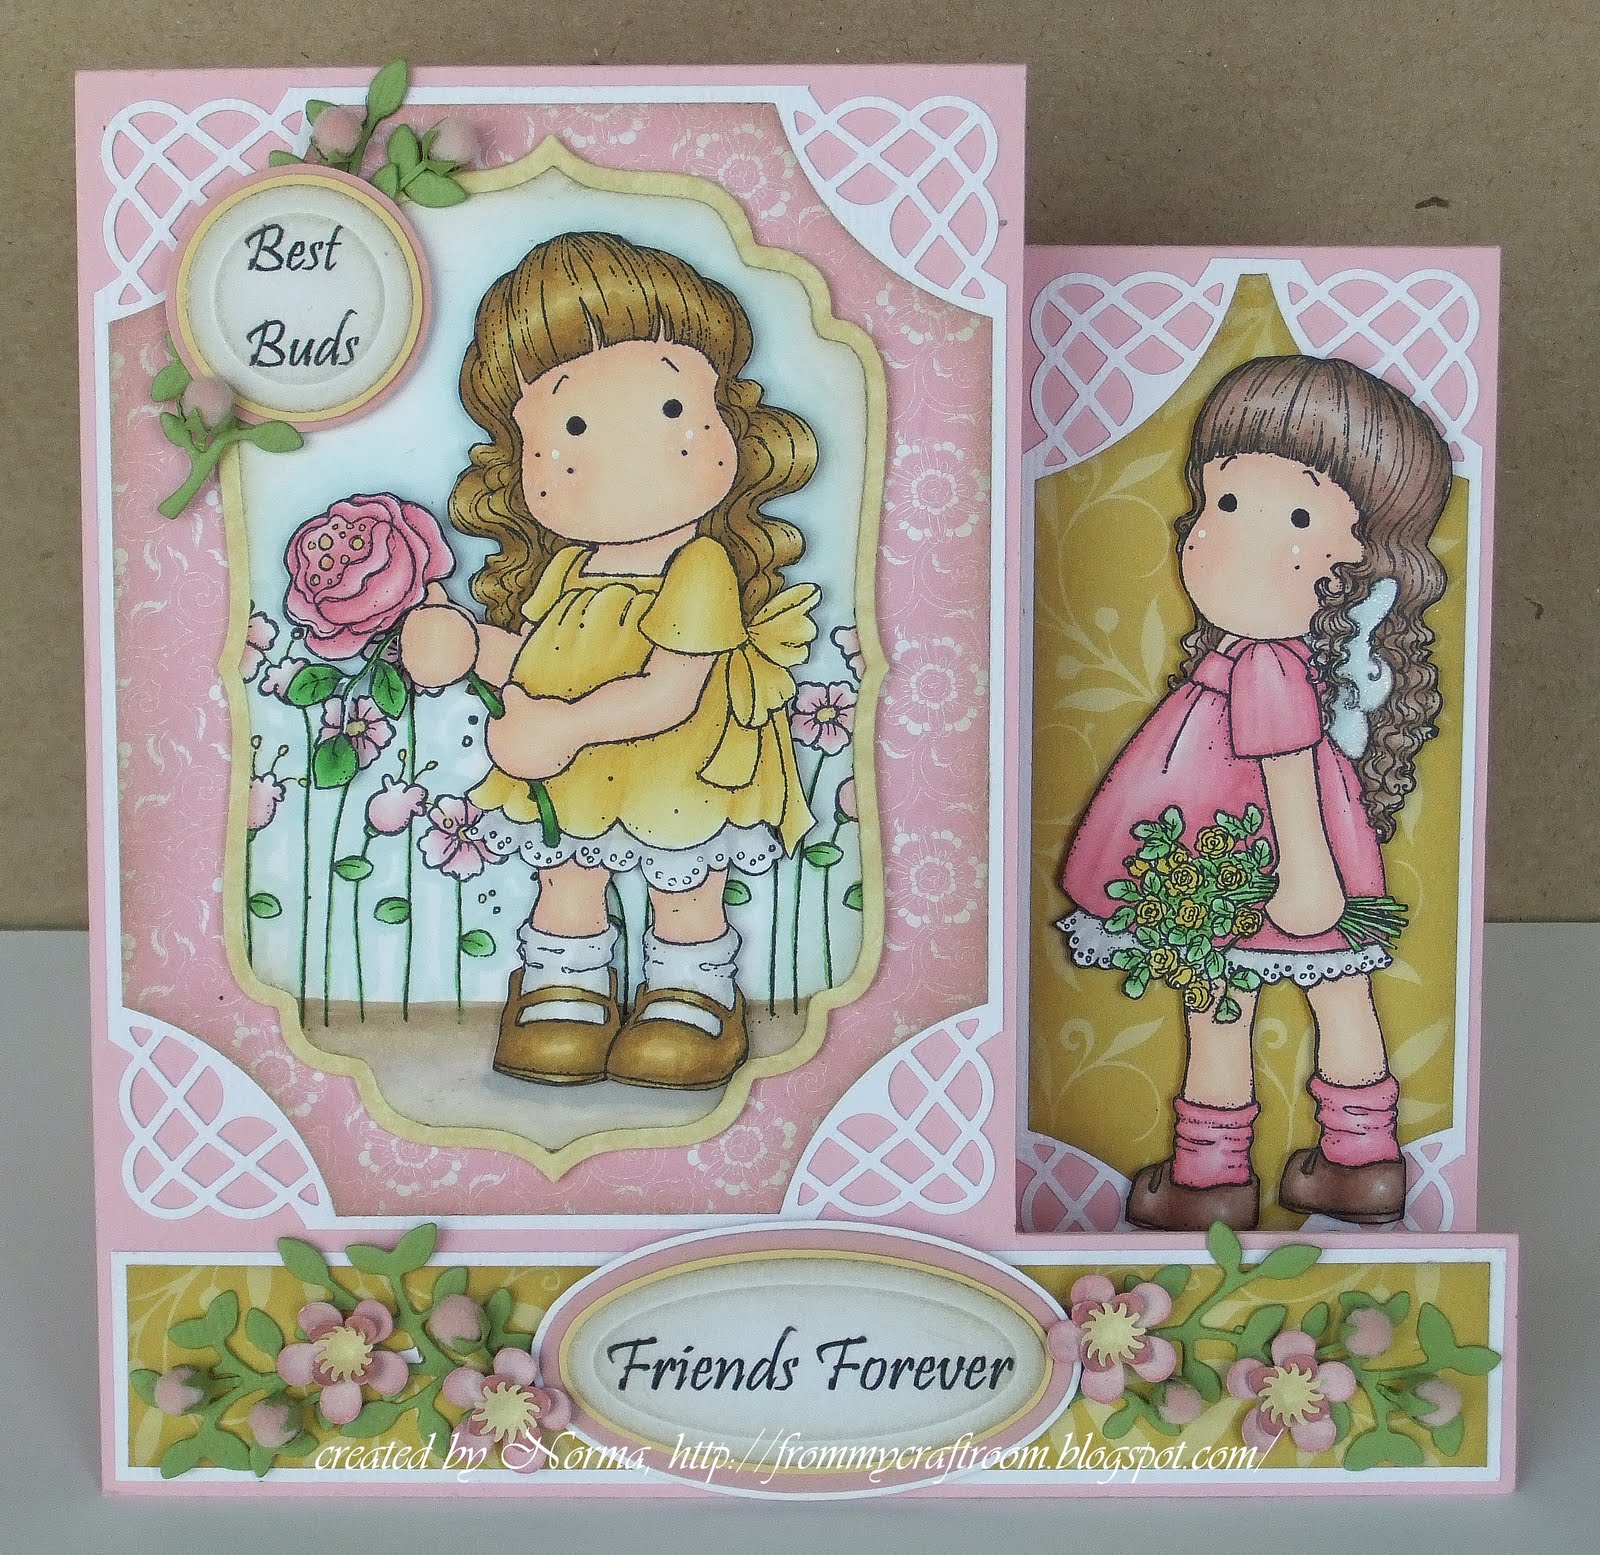
Best Buds

Oh, happy happy Tuesday!

It's launch day for our new Magnolia-licious Challenge Blog! Woo hoooooo.... I have been waiting on pins and needles for this day to arrive. And I think so has the rest of the DT ladies...LOL. I feel so so honored to have been asked by Diana, owner Magnolia-licious on-line store, to work/play alongside a group of amazingly talented ladies. They are listed on my side bar and you can click on their names to visit their blogs. Oh, I am so excited... so let's get on with this....hee hee.

I have made a friendship card for our first challenge.

It's a colour challenge. The colours were chosen by our team leader Candy and she has chosen pink and yellow.

The images I have used for my card are of course from Magnolia-licious. The two adorable Tildas here are Tilda with Peony (this is my favorite from the collection) and Bridesmaid Tilda from the Wedding Collection 2010. I do not see these 2 images in Diana's current stock, but she can and will order them in for you. I have also used Lazy Summer Flowers from the Lazy Summer Days Collection 2009, to create a bit of a background.

This is another version of a 'front panel side step card'. Pam Sparks thought up the name...hee hee. She and I both did a similar type of cards at the same time (oh, how weird was that)--you can see her really fabulous card here and mine here--and we both did the templates for them also (even weirder...LOL)--hers for a 5 1/2-inch square card and mine for a 6-inch square card. Pam decided to call the type of cards we made 'front panel side step card.' That sounded good to me. The front panel there were in the center. On this new card the front panel is off to one side.

If I lay the card flat on a table, it looks like this...the bottom section that is.

I tend to ignore my corner punches, don't you? I should really make more use of them. This one is soooo... pretty. It's a Martha Stewart one--it's a seasonal one, part of their Christmas collection. Yikes...I've been naming this punch by the wrong name...LOL. I could have sworn that when I bought it last year they called it Lattice. But I noticed that this year that it's actually called String Lace. It's being sold as part of a set: a border punch along with the corner punch. I had to buy both of mine individually.

Do you like my flower buds? Aren't they cute buds? The sentiment is a play on words, of course. If you didn't catch it, 'Best Buds' is really 'Best Buddies'...LOL.

I made these little flower buds by using tiny pompoms. They do sell pink ones in the craft store, but I found their pink too bright.

So I bought some white ones instead. I dabbed some light-pink alcohol ink from my marker onto the pompom and roll it between my fingers to spread out the ink evenly. The sepal is a punched star. Using my stylus, I curled up the five points of the star. Dabbed some glue and curled it around the pompom.

This is a short poem on friendship that my sister found for me. I have used it for the inside of my card.

I didn't add too much embellishment here, as I wanted to be able to close the card flat.


I hope you will join the fun with our challenge. Hop over to the Magnolia-licious Challenge Blog to get the details for it. Have a look at the fabulous projects that all the DT ladies have created--really, you won't be disappointed. I hope they will inspire you to create your own project and join in. And there's a prize to boot!!! GIFT CERTIFICATE FOR $25.00 from MAGNOLIA-LICIOUS!!!! You can get at least a couple of Tildas with that! Maybe from the new Merry Little Christmas Collection 2010. Have you seen the images? Ooohh, they are all so adorable. My order was in my mailbox when I came home from work last night...woo hoo. Oh, I can't wait to start playing with them.

Also, please visit the individual blog of the other DT members to have a closer look at their creations and get the details on them...and it wouln't hurt to leave a comment too--they are very much appreciated.


Stamps: Tilda with Peony and Bridesmaid Tilda from the Wedding Collection 2010, Lazy Summer Flowers from the Lazy Summer Days Collection 2009. The sentiments are computer generated.

DP's: Recollections Southern Hospitality Collection Southern Bell and Batked My Interest Collection Sand.

Tools: Martha Stewart corner punch String Lace, Spellbinders Nestabilities Labels Four and Petite Ovals Small using Big Shot machine, Joy! Crafts cutting and embossing dies Branches, EK Success punch Retro Flower Small, Martha Stewart flower punch, flower centre punch from Michaels $1.50 bin, Fiskars corner punch Celestial (for the stars).

Misc.: Creatology 5mm white pom poms, Tim Holtz distressing ink pad Frayed Burlap.


In case you are interested in making one these front panel side step card, I've drawn a template here with the measurements that I used. My cards are usually 6 inches x 6 inches, so the cardstock size I used is 12 inches x 6 inches.


Thanks for taking the time to drop by. I appreciate your visit. Enjoy your day!

Related Posts Plugin for WordPress, Blogger...