

There are lots and lots and lots of pictures here, so this is a very long posting.
Supplies required (beside your basic tools e.g. glue/scor-tape, etc.):
2 3-1/2"-square chipboards,
1 12"x12" cardstock,
2 clear acetate 2 7/8" x 5" (or 5 1/16" is better),
designer paper to decorate
These are the 3 templates. You can probably figure them out yourself as I've put details on them, but the following pictures and explanations might make it easier. I'm breaking this down into 3 parts.


PART 1 - THE BOX
Cut out two 3-1/2" square chipboards. You only need one for the box, the other one is for the lid.
 Round the corners.
 Cut out 4 designer-paper squares of the same size.
 Glue to the top and bottom of each chipboard square.

 Draw diagonal lines from the corners of the frame.
 Draw lines 1/8" away on both sides of each diagonal lines.
 I've drawn heavy lines where now you should cut away with your craft knife.
 Apply 1/4" scor-tape on the frame of the window.
 Peel off the protective paper (or whatever you call it) and place the clear-acetate rectangles in place.

 Apply 1/4" scor-tape along the top, peel off the paper and fold the top of the box toward you. This will double the strength of the top rim of the box.
 Flip over so now the outside of the box is facing you. Apply 1/2" scor-tape along the bottom of the box. Apply 1/4" score-tape along the vertical edge of the box. Peel the protective paper off this and close the box by bringing the open edges together.
 Cut the corners of the box to the score lines as shown.
 Fold along the score lines.
 Peel off the protective paper.
 And center the box on top one of the chipboards. I actually prefer to use glue here as with the scor-tape you have to get it right the the first time. With glue, you have several seconds to reposition it if you're off centre.

 I cut out a square piece of designer paper ( 2 7/8" square) to line the bottom of the box so it looks nicer.

PART 2 - THE LID
 Score along the broken lines. And then cut along the lines that have been darken below. Discard the pieces that are marked with and 'x'.
 Fold along score lines.
 Apply 1/4" scor-tape along the outer edges.
 Peel off the protective paper and form the little box for underneath the lid.
 Center it on top of the second decorated chipboard.
 This lid should fit snugly into the rim of the top of the box.

PART 3 - THE ROOF
 Score 1/2" from each of the 4 sides and score a one-inch square in the centre of the paper.
 At each of the 4 corners, cut off a 1 1/2-inch square as shown below.

 You should end up with this right now.
 From the corner of the 1-inch square in the middle, score 3 diagonal lines to the points at the corner of the paper as shown above.
 Round the corners.
 Cut out 4 designer-paper squares of the same size.
 Glue to the top and bottom of each chipboard square.
Now for the walls of the box. Cut out 6" x 12" cardstock. The side of paper that's going to be the inside of the box should be face up now.
 Score lines as indicated. DON'T draw the broken lines like I have. I've only done them so you can see where the score lines should go.
Horizontally at 2 15/16", 5 7/8", 8 13/16" and 11 3/4".
Score lines as indicated. DON'T draw the broken lines like I have. I've only done them so you can see where the score lines should go.Horizontally at 2 15/16", 5 7/8", 8 13/16" and 11 3/4".
Vertically at 3/8" from the top and at 1/2" from the bottom.
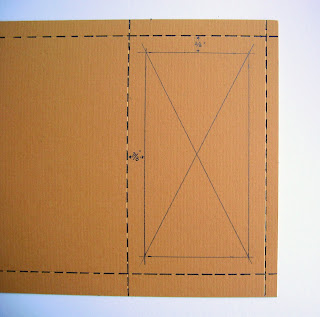
Now to make the windows on 2 alternating sides of the box, draw a frame 3/8" from the score lines.
 Draw diagonal lines from the corners of the frame.
 Draw lines 1/8" away on both sides of each diagonal lines.
 I've drawn heavy lines where now you should cut away with your craft knife.
 Apply 1/4" scor-tape on the frame of the window.
 Peel off the protective paper (or whatever you call it) and place the clear-acetate rectangles in place.
 Apply 1/4" scor-tape along the top, peel off the paper and fold the top of the box toward you. This will double the strength of the top rim of the box.
 Flip over so now the outside of the box is facing you. Apply 1/2" scor-tape along the bottom of the box. Apply 1/4" score-tape along the vertical edge of the box. Peel the protective paper off this and close the box by bringing the open edges together.
 Cut the corners of the box to the score lines as shown.
 Fold along the score lines.
 Peel off the protective paper.
 And center the box on top one of the chipboards. I actually prefer to use glue here as with the scor-tape you have to get it right the the first time. With glue, you have several seconds to reposition it if you're off centre.
 I cut out a square piece of designer paper ( 2 7/8" square) to line the bottom of the box so it looks nicer.
PART 2 - THE LID
 Score along the broken lines. And then cut along the lines that have been darken below. Discard the pieces that are marked with and 'x'.
 Fold along score lines.
 Apply 1/4" scor-tape along the outer edges.
 Peel off the protective paper and form the little box for underneath the lid.
 Center it on top of the second decorated chipboard.
 This lid should fit snugly into the rim of the top of the box.
PART 3 - THE ROOF
This part took me the longest to do. I went through several revisions before I ended up with this one.
Cut out a 6"x6" piece of cardstock.
 Score 1/2" from each of the 4 sides and score a one-inch square in the centre of the paper.
 At each of the 4 corners, cut off a 1 1/2-inch square as shown below.
 You should end up with this right now.
  From the corner of the 1-inch square in the middle, score 3 diagonal lines to the points at the corner of the paper as shown above.
Then make the folds along the score lines. Look at the template for this one. As I indicated there, the middle diagonal line at each corner should be a valley fold. The rest of the lines are mountain folds. I should look like this now.
 Flip over.
 Apply glue as shown here and glue the corners together.
 So, this is your roof. You just have to glue it on top of your lid now.
 Apply glue.
 And centre it on top of your lid.

 Voila! Now you can decorate it anyway you want.
 And this is how I ended up decorating my lantern gift box.

 I am putting a pillar candle as a gift in the box, thus the sentiment to match.
 Flip over.
 Apply glue as shown here and glue the corners together.
 So, this is your roof. You just have to glue it on top of your lid now.
 Apply glue.
 And centre it on top of your lid.
 Voila! Now you can decorate it anyway you want.
 And this is how I ended up decorating my lantern gift box.
 I am putting a pillar candle as a gift in the box, thus the sentiment to match.
See, this doesn't look so hard, does it? Now go and make your own gift box!!!


43 comments:
Thank you for the wonderful tutorial. I can hardly wait to try it out!
Hugs,
Deana
Thank-you so much for taking so much time and posting a wonderful turtorial. I can't wait as well to get started!
Christine
Wow, this is STUNNING!!!! Thank you so much for that wonderful tutorial. Hugs, Christina C.
WOW! This is incredible Norma!! I love it! And thank you so much for posting the tutorial!!
Norma, this is absolutly gorgous! Thanks for sharing this tutorial with us. I also love your candle you made to go inside.
hugs
Pattie
Thank you so much for this tutorial! I love the lanterns and will give it a try for sure :)
Big Hugs Tanja
very interesting tutorial..it seems complicated but i will give it a try...thank you very much for sharing ...
wow what do you make beautiful cards and other things. Ive just been follower from your blog.
greetings Daantje
Thank you for this tutorial!
Thank you! Your blog post will be advertised on the DigiFree Tutorials search engine today (look for timestamp: 06 Dec [LA 02:00pm, NY 05:00pm, UK 10:00pm] - 07 Dec [OZ 09:00am]).
I love this tutorial, thanks for sharing. I will definitely try to make this before Christmas!
Great tutorial and so detailed! Thank you so much! :o) Angela
wow! amazing! Tilda and Edwin grace your lanterns perfectly!
Pam Going Postal
Norma, you did an EXCELLENT job putting this tutorial together and all the photos that go with it. You are a cretive genius to have figured all this out and thank you so much for sharing this. I am so impressed with your talent! Your lantern box and card are beautiful. Your Mom will definitely love this set! Hugs, Cami
This is FANTASTIC! Thank you so much for sharing. I can't wait to give it a try!
Wow, this is amazing and quite daunting. I think I will have to wait until I retire to try this.
Hugs, Christina C.
Thank you for this beautiful tutorial!It's wonderfull!
ein ganz liebes dankeschön für die tolle und ausführliche Anleitung.
Die Lampe ist so süß :O)
LG
Yvo
Gosh Norma, how can I not leave you a comment on this post, well I thought I did :op
I got to borrow this tutorial, Love it. You ROCK on your tutorials!!
Hugs,
Cabio
Danke sehr an den Webmaster.
Gruss Nadja
Norma, this is so wonderful! I made one, and your tutorial was really easy to follow. Thank you, and I look forward to seeing more of your creations! Lisa
http://mldesignworks.blogspot.com/2010/12/fussy-and-fancy-challenge-anything-but.html
Here's my lantern!
WOW! this is AMAZING!!! such a BEAUTIFUL gift. Your tutorial is very clear and easy to follow. THANKS
Wendy
daffygal
Hi Norma;
Great tutorial, very clear and easy to follow. I am off to try it. Thanks for sharing.
Have a GREAT DAY!!!
Bob L.
www.happycardmaker.blogspot.com
Best Lantern I've seen and the Tutorial is so clear, Thanks for sharing it.
One I will make a few of it for sure.
Oh my goodness, Norma! This is AMAZING!!!! Thanks for sharing your wonderful tutorial with us!!!
Nice work its seems very attractive i like it
Gift Pakistan
This is truely stunning. Thank-you soooo much for sharing and for such a clear tutorial. I just know I'm going to have super fun making these. Hugs from Elaine in NZ
So So cute,I really like it.Thank,s for so nice sharing.
Send gifts to pakistan from usa
c'est magnifique !!! je viens de poster ma réa !!! un grand merci pour toutes ces explications !!! merci bises
http://scrapgala.canalblog.com/archives/2011/01/01/20014676.html#comments
oh my! this is one awesome lantern- I will definately give this one a try...however I'm not sure I could do it justice like yours, but thankyou for the super easy instructions (well they make sense when I read it just have to get my fingers to make sense of it LOL!!) LOVELY thankyou so much for sharing
xox Tania xox http://angeliccrafter.blogspot.com
Your gift box is so beautiful and the tutorial is very clear.
Finally I gave it a try too and this is what I've made: http://sammiescrapt.blogspot.com/2011/03/lantaarn.html
Thanks a lot for sharing.
I love your lantern!!
Thanks so much for this tutorial and sharing!! The tutorial is, like Sandra said, very clear.
I made one too:
http://marthastiens.blogspot.com/2011/03/een-lantaarn-en-nieuws.html
Have a nice weekend :-)
Martha
Ich habe gerade Ihren Feed zu meinen Favoriten. Ich wirklich viel Spaß beim Lesen Ihrer Beiträge.
Just posted my completed lantern on my blog. Although I made some changes, your tutorial is what made it happen. Thank you so much! Hope you like what I did with your help.
http://galevarland.blogspot.com/2011/04/spring-may-have-sprung.html
This is just beautiful Norma. Many thanks for sharing this great tutorial.
Thank you so much for sharing this tutorial. Bookmarked it quite a while ago, but now I made the lantern, using your description and photo's! What a great turorial! You can see my result here:
http://rietkam.blogspot.com/2012/03/papieren-knutsels-voor-cadeautjes.html
OMG! you provided the templates for free and did the tutorial too! I will definitely have to try this. Thanks a bunch!
thank you for this tutorial,I made it today, http://hobbyshoekje.blogspot.nl/2012/12/lantaarntje-gemaakt.html
estou encantada com seus trabalhos, são perfeitos, muito lindos, parabéns ...sou sua fã...beijos
Norma thanks for this beautiful tutorial!!
I made it today:
http://dahlymar.blogspot.com/2013/11/feliz-navidad.html
You are wonderful!! :D ♥ Thanks!!
Ok I have decided I am just going to send you my tutorial wish list haha!!! I have been trying to figure out how to make one of these!!! For tables for shower! the other tutorials I saw were way over the top complex, esp since I need to make a number of these I needed simple!
Thanks bunches!!!!
Jackie P
wowww te quedo hermoso ..Gracias por compartir
So many lovely ideas! I like the your Lantern gift box ideas the best,
Send Gifts To Pakistan
Post a Comment