
I have to mention first, as I did with my first mini round easel card below, that I saw this at Marianne's blog. However she didn't give any instructions as how to make it, so I had to figure this out. So, this is how I made mine.
I have lots and lot of pictures here--it's easier to show you, as sometimes I don't know how to explain very well.
I created this Christmas card for the tutorial, so I'll just take you through the steps.

 Materials and tools:
* Cardstocks,
* A die-cutting machine--I have a Big Shot.
* Various die cuts. These are the Spellbinders Nestabilities that I used:
Classic Scalloped Circles Large - largest size,
Standard Circles Large - largest and 2nd largest sizes,
Petite Scalloped Circles Large - 2nd largest size,
Small Classic Inverted Scalloped Circles - largest size.
*To decorate your card: Designer paper, coloured image(s), sentimen (s), 1 large brad is mandatory, other embelishments are optional--decorate any way you want.
You need a cardstock that is wide enough to accomodate your die cut. For the one I used--it's largest scalloped circle that I have--that's about 4 1/2 inches wide.

Score at 4 1/2 inches from the top and fold.

To cut out the card, there are 2 ways that I've used of placing your die cut.
(I use removable tape to secure my die cut to the paper--they tend to move around if you don't.)
This is placement no. 1 (the fold will be uncut through 2 arches)

as seen from the other side.

This is placement no. 2: (the fold will be uncut through 3 arches)
 and as seen from the other side
I have used both placements and they both work well. For this particular card, I have used the 2nd one.


Open the card and score midway the top section. Make sure that this is exactly half way...

so that when you fold it down, the scalloped edges of the top half should match the scalloped edges of the bottom half exactly.

This is the base of your easel card.


Open the card and score midway the top section. Make sure that this is exactly half way...

so that when you fold it down, the scalloped edges of the top half should match the scalloped edges of the bottom half exactly.

This is the base of your easel card.

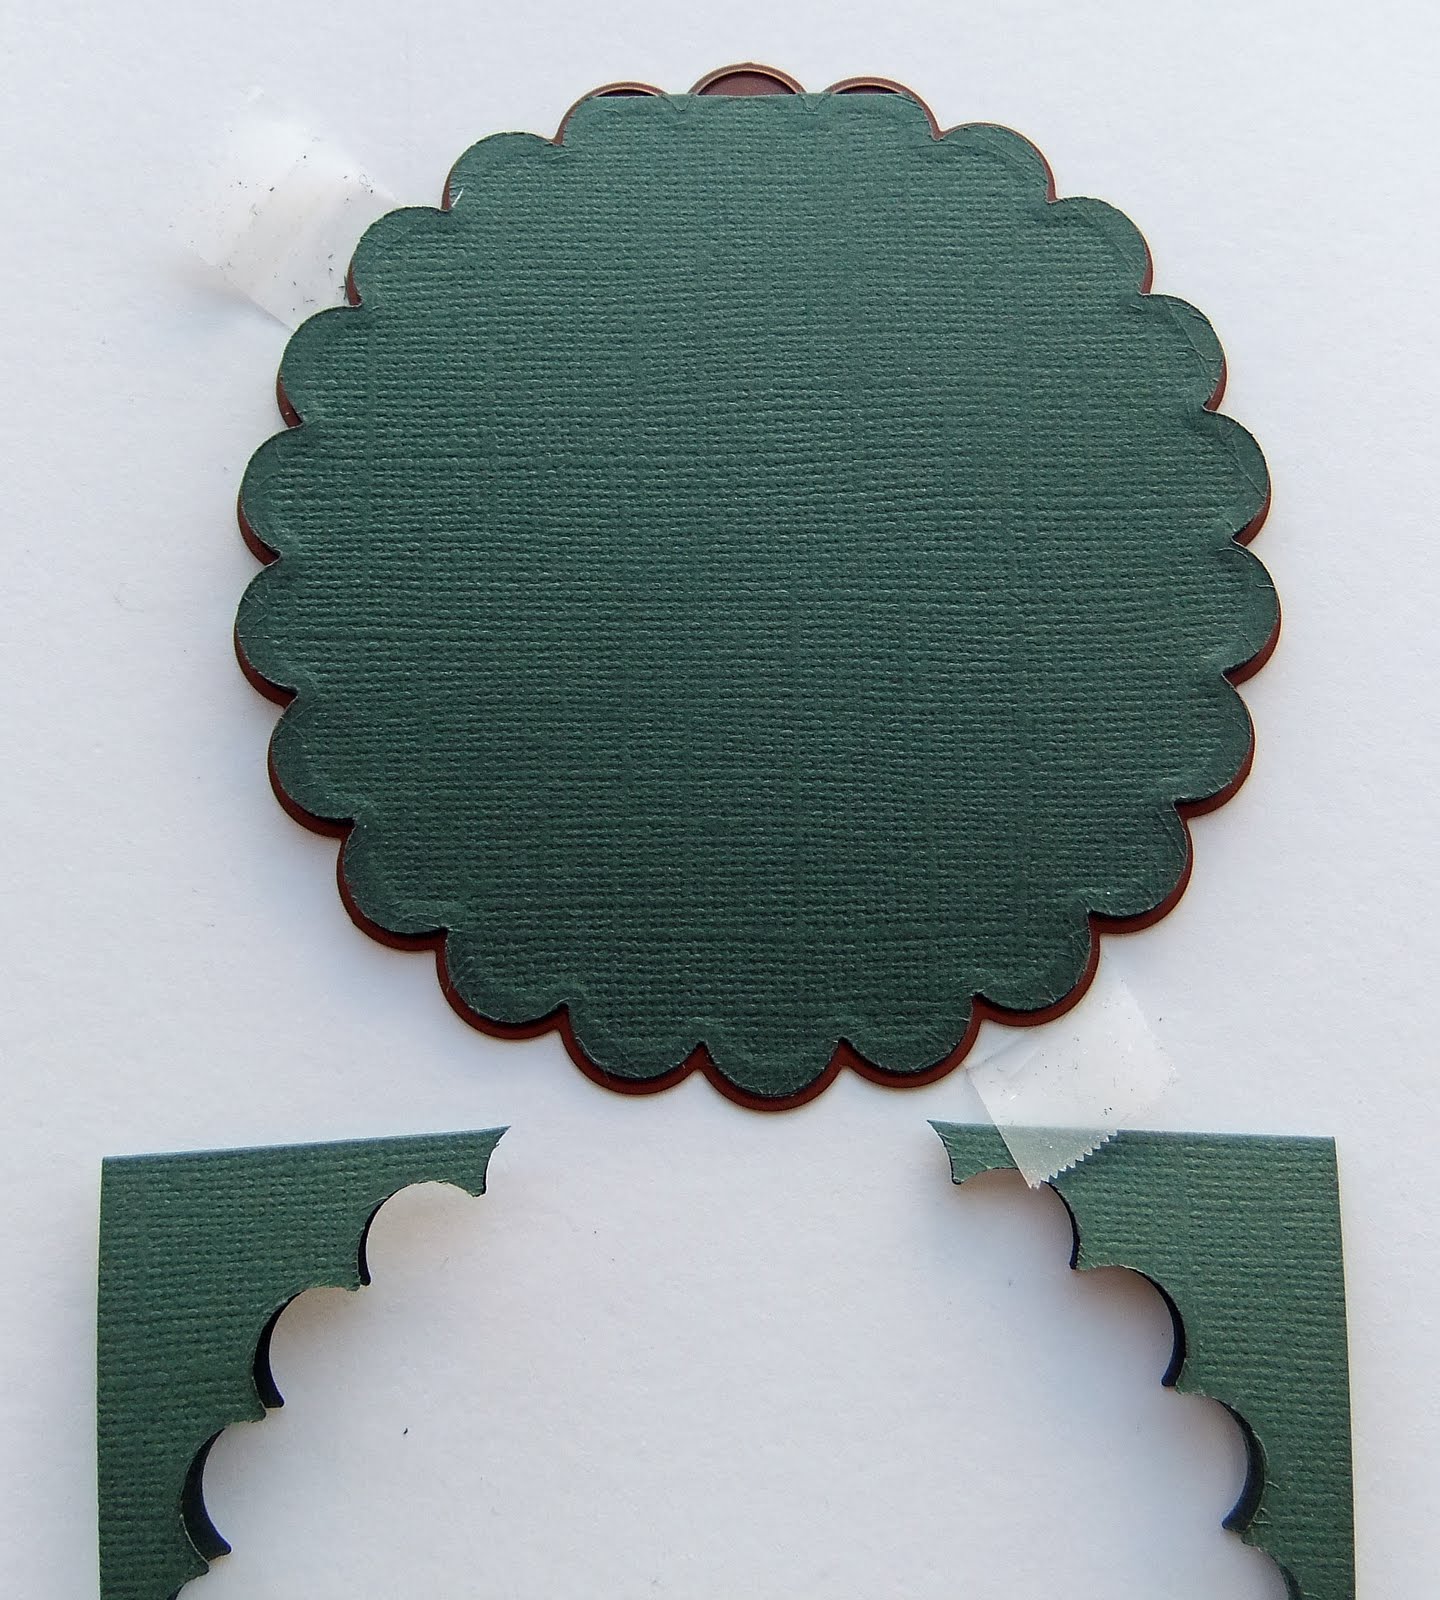
Cut out 2 scalloped circles--same size of your card base, use the same die cut. These are full circles--not cut off at the top.


Place one of the full scallopped circles over the glue--make sure all the scallop edges match, top to bottom.


Place some glue on the front half of the folded section of the easel card base.

Place one of the full scallopped circles over the glue--make sure all the scallop edges match, top to bottom.

And voila, there you have your easel card!

Now you can go ahead and start decorating it.

Now you can go ahead and start decorating it.
Figure out how you're going to decorate this and from other cardstocks and/or designer papers, cut out as many inner circles, scalloped circles or other shapes, as many or as little as you want. The ones that I used are listed above.

I started with decorating the bottom section of the easel card first.


I started with decorating the bottom section of the easel card first.
The next set of instructions is how I dealt with having the back of the brad NOT showing at the bottom of your easel card.
I've glued the DP's and cardstocks together as shown below.
I will call these circle #1 for one shown on the left and circle #2 for the one at the right side.

Take circle #2 and place it over the bottom section of the easel card, lining up the scalloped edges. Determine where you're going to place your brad--centered, near the bottom.

X marks the spot...

Take your piercing tool and make a hole here.

Take circle #1 and centered it exactly over circle #2.


X marks the spot...

Take your piercing tool and make a hole here.

Take circle #1 and centered it exactly over circle #2.

Make sure it is exactly centered.


Keeping the 2 circles together, turn them upside down.
Take your piercing tool and through the earlier-made hole on Circle #2, pierce through and make a hole in Circle #1 which is the one underneath.

Take your piercing tool and through the earlier-made hole on Circle #2, pierce through and make a hole in Circle #1 which is the one underneath.

Turn right side up and place a large brad through both circles.


Turn the circles upside down again, and place glue at the back of Circle #1.


Glue in place on the bottom section of the easel card.

Now, you have some snipping job to do to the top edges of Circle #2 or else you won't be able to close the card. Fold the top section back and then turn the card over. You will see the overlaps as below.
 Snip off the overlaps as shown here.

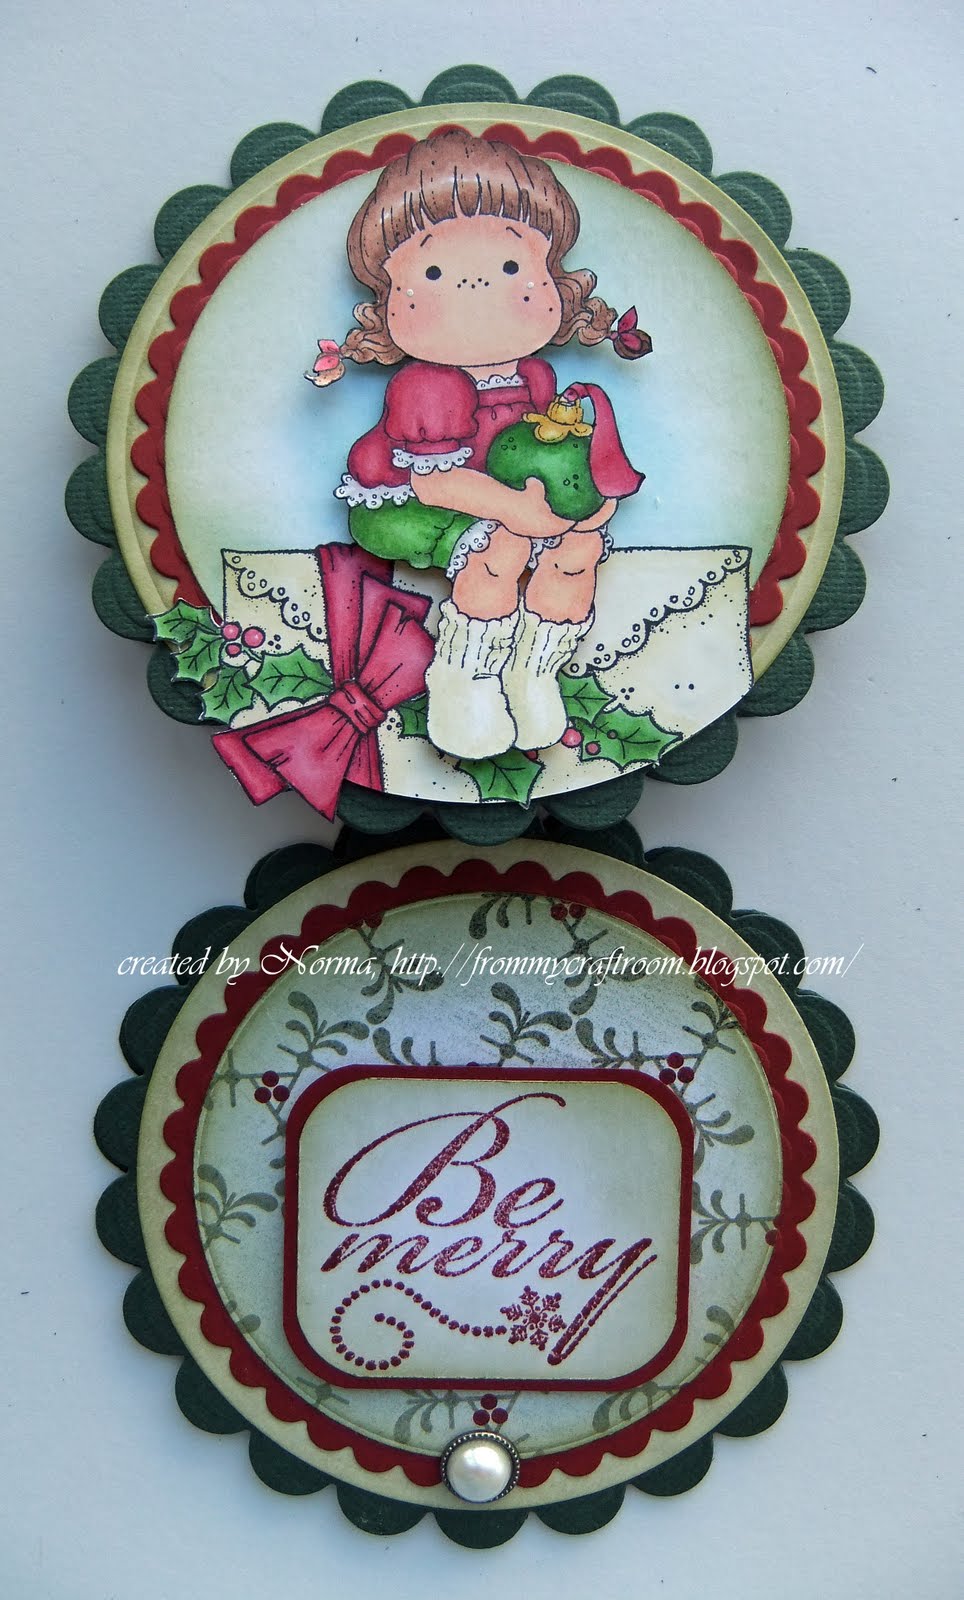
Now you can go ahead and decorate the rest of your easel card--the top section and the finishing touches like the sentiments and embellishments.

Now, you have some snipping job to do to the top edges of Circle #2 or else you won't be able to close the card. Fold the top section back and then turn the card over. You will see the overlaps as below.
 Snip off the overlaps as shown here.
Now you can go ahead and decorate the rest of your easel card--the top section and the finishing touches like the sentiments and embellishments.
And there you have it!


 I've used some detail white embossing powder and heat embossed the stamped image to make it really stand out.

Here's a card I made just for the fun of it. If you don't have time to colour your images, you can simply used a stamped image.

 I've used some detail white embossing powder and heat embossed the stamped image to make it really stand out.
And here's my personal my message to you.....
That's it. Hope this helps. Happy crafting!
PS. Please e-mail me if something doesn't make sense here, so I can make amendments. Thanks.

42 comments:
A fantastic tutorial Norma! I love how the inside opens out. Very cute!
Hugs
Kylie
FABULOUS Norma - I LOVED this idea when I saw your first card and these beauties makeme love it more! One more thing on my wish list to try - LOL
xXx
Your cards are gorgeous Norma and this is a great tutorial! I love the extra space underneath with the brad! Great idea.. thanks for sharing ♥
thanks for sharing such a fascinating tutorial. will try it out someday :)
Great tutorial, for an equally great card, fantastic!
Thanks so much Norma, your tutorial is really fantastic and very clear. The extra cards you've used here for the tutorial are gorgeous. I know this took a lot of time so thanks for sharing it with us!
Hugs,
Barb
Lovely tutorial. Oh my , you are a true , and gifted artist. Thank you for sharing.
Love,
-Samya :-)
Thank you so much Norma! Fantastic tutorial and wonderful detail. Will have to try these, they are so cute. Love your Tilda on the envelope. Will go on my list to get now!!! The Snowflake card is adorable too! You do such fantastic work....perfect down to every last detail!!!
Wow Norma,
This is such a cute project! I'm going to have to give this a whirl! THanks so much for sharing.
Blessings to you~
Leslie Avila
Wow - what a great tutorial. You've made this really clear and easy to follow. Thank you. Jaqui x
Norma, this is sooooooo adorable. Your tutorial is great too!! Another card to add to my list of "need to make".
Tracy V
Superb tutorial - now even I should be able to make an easel card!!!
Charlotta
Fabulous tutorial Norma! I am just thrilled you've posted it as I plan to try it out really soon. Gorgeous card and I love how it opens up ~ just perfect. Thanks for sharing. Hugs, Maria
Fabulous tutorial Norma, I will definately be giving this a go. Your creation is stunning and very inspirational.
Happy crafting
Tracy x
I made a card similar to this and used your idea to add the third piece. Mine is not done exactly like yours, but I wanted to give you credit for the idea and thank you for it, so I added your link to my post. Feel free to pop over for a look, and thank you!
Hugs,
Carolyn
http://creativecardcorner.blogspot.com/
this is brilliant - great idea especially how it slides open!
Wonderful tutorial...thanks for sharing. Very easy to follow...can't wait to try making on of these cards, yours turned out beautifully.
Hugs~
Corinne
What an awesome idea Norma. Your craft is so beautiful and very neat.
Thank you so much for putting the time and effort into doing this tutorial. I now know what I will be doing for the day.
I love the snowflake card as well.
Hugs Marion (Maz)
Awesome tutorial on this Norma. Ver inspirational and helpful :o)
Hugs,
Cabio
Thanks for the tutorial. This is such a beautiful card and your color choices are so rich feeling!
Jo
Norma, thank you so much for this great tutorial! Your card is so pretty too! Gotta put this on my to do list! Hugs, Cami
thanks Norma! this is FABULOUS!
Pam Going Postal
Hi Norma,
Fantastic tutorial and so easy to follow much appreciated.
Margaret
Norma...how absolutely fabulous!!!! I loove this...and am ever so grateful for the tutorial. I am definitely going to try this one girlfriend!! Pat Frank
Hi Norma.....love that Frosty's first birthday card.....so funny. Beautiful work as usual.
Bye 4 now. Laura
Amazing tutorial Norma,
I really will give it a try :)
Gorgeous card and thankyou so much for the tutorial, trally easy to follow, off to try one now.
WOW! What gorgeous cards, Norma! I found your blog and fantastic tutorial via Maria's Blog...THANKS TO YOU BOTH!!
Really beautiful and clever - thanks for the tutorial!
What an amazing tutorial! I am just tickled over your little "Frosty" card...LOL! Its beautiful and funny...I love it!
Smiles!
Gwen
Very awesome, thank you for the tutorial. I've been wondering how to make the shaped easel cards.
Hugs,
Jackie
Norma, This is such a darling card!! I love the extra piece you added to the platform with the brad!!
Hugs,
Suzan
I found your tutorial through someone who posted a Magnolia card. I just want to thank you for sharing your talent with others. I am printing out the instructions now so that I can try this for myself. Thanks again.
Thanks for the great tutorial. The tutorial was super easy to follow and now I have a lovely card for my coworker's birthday.
Merci beaucoup d'avoir créé ce tutorial. Cela semble si facile avec vos explications. Bonne fin de journée,
Awesome tutorial...how fun are those!!! LOVE THEM!
Sheila
Great turorial. Thank you so much.
wow - that must have taken you ages to put together
it looks stunning - I will have a go over the weekend
That really creates gorgeous cards, must try it some time, what die cuts are they?
Norma, this is such a darling card!!
I just want to thank you for sharing your talent with others!
Hugs and love from germany Gisela
you really create a beautiful card..must try it sometime with Gift Card envelopes.
It's stunning idea's..so amazing work..thanks for sharing..
Plastic cards!!!!
Post a Comment