Hello.
This is in response to a few requests on how I did my round front panel side step card, picture below, posting HERE.
This is the basic template. You can probably figure out how to make the card from this template, but for those of you who needs step-by-step instructions, I've got lots of pictures below--I'm not very good with instructions...LOL. And refering to the template as you follow the pictures will probably make it easier to understand.
You start with your cut-out shape--which is a circle in this case. I don't have the size of the circle written down, because this method will work with any size circle. So take any size circle you want to use. I will show you later on that this method will work with any shape also, not just circles.
The first thing to do is to draw a line exactly halfway between the top and bottom. 2 ways of doing this:
1st method:
When cutting your circle/shape, line your cardstock with a copy/writing paper so you get an extra circle.
Fold the extra circle in half and line it up with the cardstock circle and mark the half way points.
Then draw your halfway horizontal line.
2nd method:
Simply centre your circle on the grids of your cutting mat and draw your halfway horizontal line.
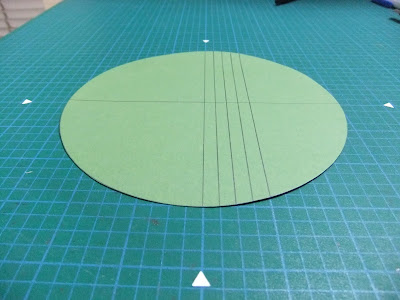
Refering to the template above, we now draw the vertical cut line and this has to be perpendicular to the horizontal line (at 90 degrees). So line up your horizontal line of your circle along one of the horizontal grid on your cutting mat and then draw one vertical line.
Where you draw your cutting line doesn't really matter. I like mine to be 1/2 inch (1.3cm) from the centre, but as shown below, you can move it further to left or right. The picture below is only for show so just draw only ONE line.
Line up the very right edge of your circle with one of the grid lines of your scoreboard. Score 1 inch (2.5cm) from it
And then again at 2 inches (5cm).
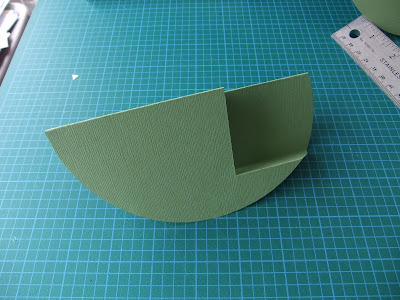
Cut along the cut line from the first score line to the last score line.
Voila! Here is the base of your round front-panel stair-step card.
Now gather all your stuff to decorate your card, eg. DP's, image, embellishments, etc. and decorate!
And this is what I ended up with...a Mother's Day card for my Mom. I'm going to put it in a posting next.
I said earlier that you can use this concept with any shape and any size. To show you, I've cut out a few different shapes of different sizes from dies that I have.
Spellbinders Grand Scalloped Circle
Spellbinders Grand Scalloped Oval
Go Kreate Frames Frilly #5
Go Kreate Square Frames Frilly #3
Hope this tutorial will be of some use to you. I am not the best at instructions, so let me know if something doesn't make sense to you. I will edit to try and make the instructions clearer.
Thanks so much for stopping by.


52 comments:
Fabulous tutorial Norma, thank you so much for sharing this, I will have to have a go later. Thank you again you always create such lovely cards.
hugs
Donna xx
Thanks for the tutorial! The card is fantastic!
hugs Regina
Norma your directions are awesome! Thank-you so much for taking the time and posting these!!!!!!
Merci pour ce superbe tuto! Maintenant on n'a plus d'excuses pour ne pas le faire! Bises. Nadine
Fantastic demo Norma, you made that look simple and easy (just how I like it)
Sorry I have not been round much, love your work, your cards are stunning, one of my favorite blogs. Debbiexx
I think you did a great job with the instructions and thanks so much for sharing.
Thank you so much Norma these instructions are fantastic. I am so looking forward to having a go not that my card will be anything like as good as yours, yours are always stunning
Max x
gorgeous card Norma! and thanks for the tuts!
Fiz uma postagem do seu blog lá no meu, obrigada por compartilhar esse pap maravilhoso. Bjs
Norma, you are an amazing innovative and creative person. Thank you for this tutorial. Once again I can add a new technique to my arsenal thanks to your inspiration. NancyD
Fabulous tutorial Norma, I need all the direction I can get, and this was perfect...followed every step, thank you...
Luv CHRISSYxx
Thanks for sharing the tutorial. I can't wait to try it.
Thank you so much by the tutorial !!!!!!!!!!!! Love it ;)
Hi Norma, I love this card you made and thank you so much for this excellent and well made tutorial. Hugs, Frea
Another stunning creation! Thanks for sharing - I'll have to give this one a try!
Hugs
Wow Norma! you are so clever. I am so hopeles when it comes to doing anything like this. Your directions are so clear so I should be able to follow them.
Thanks and your card is wonderful
Hugs Maz
Just beautiful and a great tutorial. Just received my first two magnolia stamps and for sure this will be my first card with one of them! Thank you so much Norma, I love your tutorials!
Brilliant Pure Genius! Love this Tutorial and your cards are awesome! thanks for sharing this Top Tip (tutorial with us) at Top Tip Tuesday! great idea! Hope you can come play again soon, hugs Samantha :0)
WOW a fabulous card and tutorial. Thanks for sharing with us. Your card is very pretty. Thanks for joining Top Tip Tuesday. Elaine
THANK YOU you brilliant woman!!!!!
Rene :D
Thanks so much Norma, This is just wonderful, thanks for sharing
Hugs Julie P
OMG!!! HOw could I missed this tuto. this is just fabulous, and so well explained. I wished I had seen it before, I "argued" with myself last week, trying to figure out how to do one. I will print this, and forerever be grateful . Much hugs.
Thank you so much for this tutorial.
Thanks for sharing.
I can't wait to try it.
THANK YOU SO MUCH NORMA for sharing your tutorial!! This is some wonderful information and I can't wait to try! You ROCK!!!
Hugs, Cathy-Lynn
And the tutorial too. This is just fab and I'll definitely be using it.
Thanks for joining us at Top Tip Tuesday.
Annette
xx
What an awesome card! Your coloring is beautiful. Oh, love those flowers. And thanks so much for the tutorial.
Karen
Thanks for the sharing this tutorial. I like how versatile it is..so many possibilities.
Kit L
Fabulous tutorial Norma, the direction was perfect,followed every step, thank you so much
Hugs harma
This is a fab tutorial and some lovely mother day card too. Thanks for sharing at Top Tip Tuesday and good luck. Hope to see you back tuesday for a new challenge. Bettina xx
A really gorgeous card, I love the fold and the tilda image is so sweet. Fab tutorial thanks for sharing how you made it
Lindsay xx
Totally bravo tutorial Norma!!!!
Hugs,
Cabio
Beautiful card!
Thank you for sharing your tutorial.
Hugs
Paola
WOW what a LOVELY card and tutorial! Thanks for sharing.
Thanks Norma for this great tutorial, your cards are stunning!
Hugs,
Lins
a TUTORIAL I HAVE BEEN SEARCHING FOR...THANKS SO MUCH...X
This tutorial is absolutely fanastic Norma, one of the best set of directions I have seen in blogland, don't why you don't think you are good at instructions as these are brilliant. Thanks so much for all the measurements, I have become a follower of your awesome blog, how could I not! Hugs Julie x
This looks fabulous :) thanks so much, I'm going to give it a go. Your card is absolutely beautiful!
Really beautiful! thank you so much for your generosity in sharing how to do this.. I appreciate you.
OMW this is a great tutorial - and fabulous card! TFS
Helen -- Firenze Cards
Thank you for the awesome template and tutorial. I made a Silhouette Studio cutting file of it and shared it with other Silhouette users.My card is not near as pretty as yours but it sure was fun to make. Of course, I am going to add the link to your wonderful and creative blog. Thank you for sharing your talents.
xxx - Debbie
Hi Norma. Just popping by having seen the link from Doodling Debbie. Stunning cards and fabulous ideas using the side-step variations. Great tutorial - very inspiring. Have just become your latest Follower.
Tine :)
Wao amazing stunning and fab work!!!
Hello, I have just discovered this fabulous tutorial, thank you SO much I will be giving this a go and link back to you once I put it on my blog!!
Sue
Hi Norma, I have been looking for a Stepper Card tutorial that I could actually follow without messing up - and I was SO GLAD that I found yours. I now how a Stepper Card ready to make into an Easter card - YAY!! Thank you SO MUCH for this tutorial and now I will be able to makes different shaped ones too.
Really appreciate the time and effort you put into this tutorial Norma with the step-by-step instructions.
{{hugs}}
Jocelyn
Instead of Ironing Blogspot
Thanks a lot for shering it with us
Greetings Helga
Thank you so much for sharing this wonderful tute I will give you credit when I make one very soon..
smiles Christine x
Coucou !
Elle est vraiment très belle cette carte. Je vais essayer de la faire pour un anniversaire.
Merci, Norma, pour le tuto très bien expliqué.
A bientôt
M@miogée
Awesome card!!!
Found this on Pinterest and just had visit your page to tell you 'thank you' for this idea :) -con
Your directions are very clear. I feel like I know exactly how to make this card! Thank you. S.
Over 6 years later I found this tutorial and love it. Thank you so much. Without the pictures I would never have understood it. So thanks again
Thank you for sharing this design. Your instructions are easy to follow and showing the extra shapes is helpful too.
Post a Comment