Showing posts with label Window Cards. Show all posts

Tuesday, December 02, 2014

Baby, It's Cold Outside! - Magnolia-licious 'Anything Goes'

Hello.

We're in our last challenge for the year 2014 at the Magnolia-licious Challenge Blog.  It's an 'Anything Goes' challenge and you have plenty of time to join us as we're leaving this open until the new year.

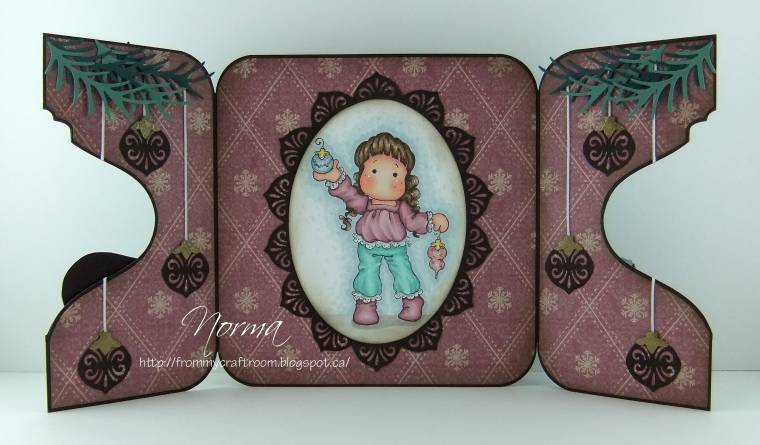
This is what I came up with.  It is a gate-fold card, a window card, a frame card and also a shaker card...yikes, all in one.


The card front shows the window and gate-fold feature of the card.


This middle section inside the card shows the frame and shaker features.  For the snow on the ground, I used white micro-beads that I've placed inside the frame and enclosed them with a piece of acetate sheet.


This angle shot shows the 3-dimensional look of the winter scene.


Close-ups of the Magnolia images I am featuring:


Tilda With Apple Wreath from the Waiting For Christmas Collection 2014


Tilda with Lovikka Mittens from the A Christmas Story Collection 2012


It's Cold Outside Tilda from the Waiting For Christmas Collection 2014

Magnolia stamps are available from Magnolia-licious, Diana's on-line store where she carries a large selection of both full-size and mini Magnolia stamps.  And if you don't see the particular one you are looking for, ask Diana if she can bring it in for you.
Check out also the stamps from Wee StampsWild Rose StudiosSaturated Canary and Candibeans.
Magnolia-licious also carries cutting dies from various companies including Memory BoxPoppyStampsMagnolia DoohickeyWild Rose Studio.  Have a look!
Prices are discounted, you get excellent customer service and you also get to earn 2% credit to be applied to future purchases.


Come and join our challenge at the Magnolia-licious Challenge Blog and you will have a chance to win a Special Surprise from the Magnolia-licious store when you follow the rules and theme of our challenge.


For your chance to win a "Leave A Comment" Surprise Package Prize from Magnolia-licious, there is a weekly random draw.  All you have to do is leave a comment--the more you comment the greater your chances.
- comment on any or all the postings on the Magnolia-licious Challenge Blog
- comments on related postings on the DT gals' blogs for that week


Challenges for this card:
Milk Coffee Challenge - Lots of embellishments
Addicted to Stamps Challenge #123 - Holiday
Divas By Design - Jingle Bells
Creative Fingers Challenge #58 - Anything Goes
Brown Sugar Challenge #122 - Anything Goes
Polkadoodles Challenge Week 48 - Nordic Christmas
Sweet Stampin' Challenge - Let it snow!
Magnolia-Mania Challenge #102 - Anything Goes
Dies R Us Challenge #15 - Winter Wonderland
ABC Challenges - Y is for Yuletide

Thanks for stopping by.  Your visit is always very much appreciated.  Enjoy your day and have a wonderful week!


Materials and Tools Used
Sentiments:  Computer generated
Designer Papers:  Recollections Botanica Noel, Botanical Noel and Starry Night paper pads  
Dies:  Magnolia Doohickey Old Swedish Lace; Poppystamps 816 Small Madison Window and 827 Picket Fence; Memory Box 98239 Country Landscape and 98753 Exquisite Coral; Dee's Distinctively IME-026 Small Snow Covered Stacker Tree and IME-027 Large Snow Covered Stacker Tree 
Punches:  Martha Stewart Pine Branch, Holly and Aspen Snowflake; EK Success Snowflake 
Miscellaneous:  Recollections micro-beads; Jewel Glitter Ritz micro-fine glitter white; Ranger Tim Holtz Distress Ink stamp pads Walnut Stain and Weathered Wood; metal bells that came with Lindt chocolates; gesso, twines, jewelry spacers and acetate sheet from my stash
Colouring medium:  Alcohol ink markers from Letraset - Promarkers, Flexmarkers and Pantone Trias; coloured pencils 

Tuesday, February 26, 2013

Happy Birthday to You - Magnolia-licious & Wee Stamps Challenge #2

'All About Boys' is the theme for Challenge #2 at the Magnolia-licious and Wee Stamps Challenge Blog.  Yes, it's time for new one!  Hope you'll come and play with us.  For more details on how to join in the fun, hop over to the challenge blog and while you're there, be inspired by the fabulous cards of my DT Teammates. 

Here's the card that I've created for the challenge.  


As you can see below, this is actually a window card...and you can see part of the scenery in the back through the window.

 
The inside of the card looks like this.  I've added a blank panel to write a personal note on.


These are the Magnolia stamps that I used to create the scenes:

 
- Cool Edwin from the Sweet Rainbow Collection 2011
- Fairytale Summer Background from the Fairytale Collection 2010 (this is actually only half of the actually background image.  I have cut out the rainbow and sky to create the window effect.  If you click on the stamp name above you can see the original image.)
 

- Edwin With Bike from the Lazy Summer Days Collection 2009
- Bird Background from the Sweet Rainbow Collection 2011

Magnolia stamps--a vast selection of both full-size and mini stamps--are available at Magnolia-licious, Diana's on-line store. If you don't see the particular one you are looking for in the store, contact Diana and ask her if she can bring it in for you.
And newly available at Magnolia-licious are those wonderful Wee Stamps by Sylvia Zet.
Have a look also at the selections of cutting dies also from Magnolia, Memory Box, PoppyStamps, Marianne Design, Cheery Lynn Designs and Joy! Crafts.
Diana offers discounted prices, gives excellent service and you get to earn 2% in-store credit with every purchase! Sweet!!
 
Challenges for this card:
ABC Challenges - H for Happy Birthday
Card Makin' Mamas Challenge #65 - It's Birthday Time!
Bearly Mine Challenge #75 - Anything Goes
Totally Gorjuss Challenge #172 - Happy
Craft Room Challenge - Something For A Man
Creative Card Crew Challenge 30 - Birthday
Anything Goes Challenge #87 - Make It Manly

That's it for now.  Thanks for stopping by.  Your visit is always very much appreciated.  Have a wonderful week.


Materials and Tools Used:
Sentiments:  Computer generated
DP:  Recollections Bold Basics paper pad
DiesMemory Box Fresh Foliage; Spellbinders Labels Twenty-Eight; Cheery Lynn B162 Lace Corner Deco B
Miscellaneous:  Ranger Tim Holtz distress ink stamp pad Walnut Stain
Colouring Medium:  alcohol-ink basedmarkers from Letraset--Promarkers and Pantone Trias

Friday, July 13, 2012

A Christmas Gate-Fold with Window Card

Hello!

Okee-dockey...finally!   Here's the finished card of the tutorial I did a few postings ago (here).


I've added some glitter to the ornaments that Tilda has in her hands.  I used a border punch to border my oval panel (tutorial here) and to make the hanging ornaments.  This adorable image is of Tilda Hanging Ornaments from Magnolia's Merry Little Christmas Collection 2010.  And I used my markers to do the colouring.


Check out Diana's on-line store Magnolia-licious for both full-size and mini-size Magnolia stamps.  She also has a fabulous collection of cutting dies from Memory Box, PoppyStamps, Magnolia, Marianne Design and Cheery Lynn.  The prices are discounted and for a bonus you also get 2% credit that you can use on future purchases.  How cool is that! 

Challenges for this card: 
Hooked on Craft Challenge #22 - Christmas in July
Magnolia-Mania Challenge #50 - Merry Christmas
Divas By Design Challenge #43 - Christmas in July
Crafty Creations Challenge #178 - Free For All
Little Red Wagon Challenge #141 - Christmas in July
Crafty Sentiments Designs Challenge - Christmas in July
Shopping Our Stash Challenge #59 - Extra Fold or Pleats
Twisted Tuesday Challenges - 2TC14 A Holiday Pick 2! (Christmas, twine and die cuts)
Whoopsiedaisy Challenge - Make Your Own Embellishments
Christmas Cards All Year 'Round - Christmas Flowers/Holly

That's it for now.  Thanks so much for stopping by.  Appreciate the visit.  Have a wonderful weekend. 

  
Materials and Tools Used: 

DP's:  one paper from each of American Craft pattern papers Jolly and Recollections the Ballet paper pad

Dies:  Spellbinders 2011 Heirloom Ormnaments, Classic Ovals and Bitty Blossoms ; Magnolia Poinsettia Doohickey; Cheery Lynn Pine Branches; Memory Box Holly Vine and Cherry Blossom flower centre 

Punches: EK Success border punch (sorry, don't know the name right now--have to research)

Miscellaneous: Tim Holtz distress ink stamp pad Walnut Stain; pearls, string and glitter from my stash


Medium:  Letraset Promarkers and Pantone Tria markers
- face and skin—blush, coral, soft peach, vanilla, oatmeal, pastel pink
- hair—umber, cinnamon, tan
- blouse and socks--shale, 694-T, 693-T, 698-T 
- pants--563-T, 337-T, 331-T, pastel green

Sunday, July 08, 2012

Gate-Fold with Window Card Tutorial

Hello!


A few people asked me how I created the card in my previous posting, so this is a tutorial on a gate-fold card that has a shaped window.  Since the usual gate-fold card is easy enough to do and there are already lots of tutorials on it (here, here and here are just a few), this tutorial is really on how to create the window on the card using one of your shape dies.  I'm assuming that's what the requests were for--if not, then let me know please.  BTW this is easy too...LOL!

This is for a 6" x 6" card.  I am creating a new Christmas card and will give you the step-by-step instructions in making it.


Materials required:
- 6" x 12" cardstock
- DP's, coloured image(s), embellishments, sentiments, etc. to decorate
- a shape die for your window (I am using the Spellbinders 2011 Heirloom Ornament die to match my image of Tilda Hanging Ornaments)
- removable tape
- die-cutting machine (I am using my Big Shot Machine)


Step 1
Score your cardstock at 3" and 9".


Step 2
Fold along scorelines.


Step 3
You may want to leave your card as a square card or if you want to shape your card, you can do it now.  In my previous card I used a Go Kreate die to shape the top and bottom of the card.  With this one, I am just going to round off the corners.  


Step 4
Decorate the card front with your DP.


Step 5
Place a couple of pieces of removable tape on the flat side of your die.


Step 5
Open your card and place your die--and this very important!--blade side up.  With this card, I am putting the die exactly in the centre.  In my previous card I have placed the die higher up.  You can place it wherever you want your window to be.


Step 6
Close the two front flaps and press so the removable tapes will stick to the paper on top and the die won't move.  Run the card through your die cutting machine.


Step 7
Voila you have your window!


And from here you can now decorate the card any way you want.  Have fun!!!

Sorry, but this is as far as I got with the card--I haven't finished it yet...LOL.  I am currently working on another project that I have to get done first--this was a detour.  I will get back to this and show you the card when finished.  


***

Edited:  Here's my finished card.  I will give the details in a separate posting.
Edited again:  Posting for card HERE.


Monday, July 02, 2012

Birthday Gate-fold/Window Card

Hello.
My latest birthday card that I had to rush to finish.  It's another gate-fold and window shaped card.


I should have put a different colour background rather than white--the white outside frame doesn't show up to well here.  Oh well, no chance to take better pictures now as the card is already in the mail...LOL. 
I used a Go Kreate die for the outside shape and a Spellbinder die to cut out the window shape.  I used the Martha Stewart Daisy Dot edge punch to border the circle in the card inside (see my tutorial on how-to here).


This oh so adorable image is one of Sylvia Zet's from Whimsy Stamps.  I've coloured it with my markers.  


When the card is fully open and laid out flat, it looks like this.  I've only created a small blank space to write my personal message on--had to write small...LOL. 


***Edited--I've made a tutorial for this style of cards HERE.

Challenges for this card:
Emerald Fairies Challenge #27 - Birthdays
Chocolate, Coffee and Cards Challenge #16 - Anything Goes
Sweet Stampin' Challenge - Scallops (around the sentiment and blank space)
Allsorts Challenge Week 161 - In Bloom 
Fussy and Fancy Friday Challenge #66 - Fancy Folds
Dutch Dare Card Challenge #171 - Flutterby Butterfly
Charisma Cardz Challenge #25 - Anything Goes
Crafts and Me Challenge #90 - Birthdays
Whimsy Stamps Inspirations Challenge #45 - Anything But a Square

Thanks for taking the time to stop by.  Your visit is very much appreciated.  Love reading your comments too. Have a wonderful week!
  

Materials and Tools Used:

DP's:  Recollections Graceful Paper Pad

Dies:  Go Kreate XXL Frames Frilly #5; Spellbinders Standard Circles, Petite Ovals, Petite Scalloped Ovals, Rose Creations and Scrap-Mart exclusive; Marianne Design Leaves LR0133; Cheery Lynn Mini Exotic Butterfly; Memory Box Honeysuckle Vine

Punches: Martha Stewart edge punch and 3-in-1 Hydrange Petals; Bunch Punch medium and small Daisies; Fiskars 3-in-1 Celestial corner punch; Michaels mini sun

Miscellaneous:  Tim Holtz distress ink stamp pad Walnut Stain; pearls from my stash  


Wednesday, June 20, 2012

Miss Muu Muu Mooved Me

Hello.
A bit of alliteration in the posting title there...LOL, but have to wait for Miss Muu Muu--am showing the card front first...

I've just finished this card.  I've made a gate fold card--haven't created one for quite a while now.


On the card front, I've featured the adorable Tilda With Magnolia Branch.  I've coloured her and the other images for this card with my Letraset Promarkers and Tria markers. 


The windows were made using the PoppyStamps Small Madison Window die.  For the ornamental design above the windows, I used a Spellbinder Fancy Tag Three die which I cut in half.


LOL, I've been surfing the internet looking for pictures of cows to get an idea of how to colour the image.  I like the look of a heifer cow so that's how I've coloured Little Miss Muu Muu.


The background scenery is the Barbed Wire Fence image which I've stamped twice after masking the cow image first.  The sentiments are computer generated.


The stamps for all the images I've used are from Magnolia's Summer Memories Collection 2012.  They are all available from Magnolia-licious on-line store.  Diana is also giving a 12% discount and you will also be earning a 2% Store Credit to be applied on future purchases. How cool is that!
Beside the window die I used here and other PoppyStamps dies, she also carries Memory Box and Magnolia Doohickey cutting dies.  Check them out!  


Challenges I am entering with this card:
Creatalicious Challenge #35 - Anything Goes
Simply Magnolia - Garden Blooms
Stamptacular Sunday Challenge #168 - Fabulous Folds
Crafts and Me Challenge #89- Anything Goes
Divas By Design Challenge #40 - To "die" for
Tuesday Throwdown Challenge #103 - Window Cards
Craft Your Passion Challenge #115 - Flips & Folds

That's all for now.  Thanks for taking the time to drop by.  I always appreciate you visit and your comments. Enjoy your day!


Materials and Tools Used:
DP's: from Recollections Graceful paper pad; from me&my BIG ideas paper pad
Dies:  PoppyStamps Small Madison Window and Honeysuckle Vine; Spellbinders Fancy Tags Three and Posy Patch
Punches:  EK Success medium and small Retro Flower; Nellie Snellen Extra Large Leaf and Jumbo Rose Leaves; Martha Stewart Grass Edge and 3-in-1 Hydrangea; Michaels mini star
Miscellaneous: Tim Holtz distress ink stamp pad Frayed Burlap and Victorian Velvet; pearls and acetate sheet from my stash   

Related Posts Plugin for WordPress, Blogger...