Saturday, April 28, 2012

Cupcake Gift Purse/Box Tutorial

Hello.....

In response to a couple of requests (Max and Sandra, this is for you) and for whoever else is interested, I  have made this tutorial on how I made my cupcake gift purse/box in my previous posting.


I was trying to rush through this, so if I've missed a few steps or didn't explain something clearly, please contact me and let me know.  Sorry this took so long, but it's very detailed and many pictures to take and anyway... I am normally slow with my editing, posting, etc...LOL.


MATERIALS:
one - 12" x 12" cardstock (for the purse/box)
one - 5 1/2" x 5 1/2" cardstock (for the cupcake holder inside)
one piece of acetate (large enough to cover the window)
items to decorate with (coloured images, die cuts, embellishments, etc.)


TEMPLATES:
(Easier to refer to these templates as you follow the steps.)


INSTRUCTIONS:

Let's do the easier part first and that's the CUPCAKE HOLDER...

Step 1
Take your 5 1/2" x 5 1/2" cardstock and place it against the upper left corner on your Scor-Pal scoreboard.  Score at 1/2", 1", 4 1/2" and 5".


Step 2
Rotate your paper 90 degrees and repeat Step 1


Step 3
Move to your cutting mat and cut out the 4 corners as shown.


Step 4
Fold along the score lines.  Cut or punch out a circle in the middle of the square.  I find it easier to centre the circle when I draw a criss cross from the 4 corners.  I used a Spellbinder circle die to cut out my circle.


Step 5
Glue at the 4 corners as shown.


Voila!


Now for the PURSE...

Step 6
Take your 12" x 12" cardstock and pencil draw diagonal lines from the four corners a shown below.


Step 7
Draw lines 1 13/16" to the left and right of each line as shown below.  This will make the distance between the 2 new drawn lines 3 5/8" which is slightly wider than the width of the cupcake holder (3 1/2").


Step 8
At 2 opposing corners, cut from the corners of the centre square to the paper edges, along the newly drawn lines--indicated by the arrows in the picture below.


Step 9
At the other 2 opposing corners, cut from the corners of the centre square to the corners of the paper.


Step 11
Score the 4 sidelines of the centre square. 


Step 12
Do the next several steps, from Steps 12 - 17, to each of the 2 wider opposing corners.
Corner-punch the corner.  I used a Martha Stewart Corner Punch here.


Step 13
Score as shown below.


Step 14
For the purse handle, draw lines 1/2" from the edge as shown below.


Step 15
Draw lines 1/2" from the centre line as shown below.


Step 16
Take the opposing corner and use it as a template to draw a rounded corner as shown below.


Step 17
Cut out the inside of the purse handle as shown below.


Step 18
This step is done only to one of the corners.  Cut a slit just slightly bigger than the 1 inch.


Step 19
This step is done to the other corner.  Cut out the little triangles and discard, as shown below.


This forms a flap that you can insert into the slit you made in the opposing corner lock the purse.  


Step 20
Moving on to the narrower corners.  Steps 20 - 22 are to be done to both corners.
Draw a line 4 1/2" from the side of the centre square as shown below.  


Step 21
Cut along half of the drawn line.  It doesn't matter if you cut the left or the right side, as long as you do the  SAME to BOTH corners.  (I cut on the left side here, but on the template I drew the cut line on the right side.)


Step 22
Round out the corner.


These 2 corners will lock in place like this...


Step 23
Now for the window.  I am using a Spellbinder Heart Square die here.  You may use whatever shape you want: square, round, oval, etc. Glue your diecut in place. 


Step 24
Cut out or punch out the window opening. 


Step 25
Cut out the acetate 1/4" larger than the window opening on all sides.  Attach to the inside of the purse using Scor-Tape.  


Step 26
Erase all the pencil marks you made. 
Glue the cupcake holder in place to the centre square. 


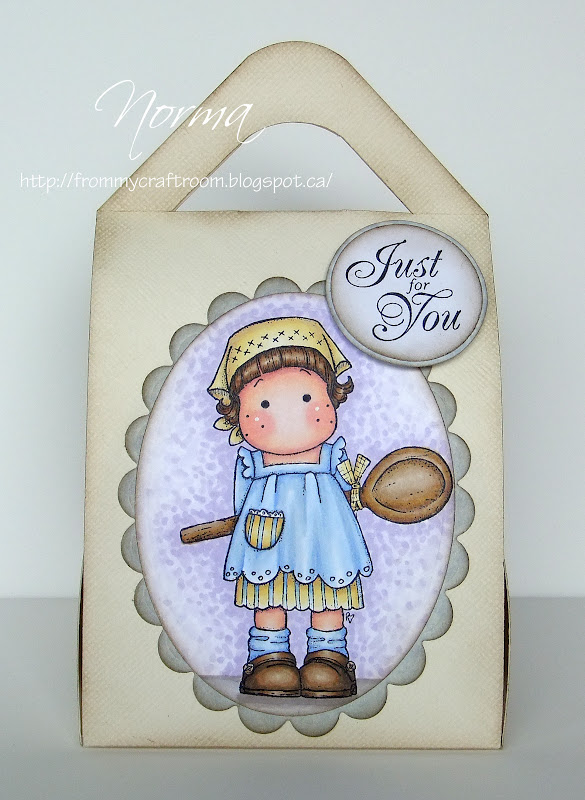
Okay that's it!!! At least for the purse...LOL.  Now you can decorate it any way you want.  


Have fun with it!  It looks complicated, but it really isn't.  
I'm done here!!!!!  Phew.....


Tuesday, April 24, 2012

One-Cupcake/Muffin Gift Purse/Box

Hello!

Seeing that today is the 4th Tuesday of April, it's time for the monthly photo inspiration challenge at the Magnolia-licious Challenge.  Here's what I came up with...       


Tracy is our hostess this month and here's the picture that she has chosen for the inspiration challenge. 


I hope you will join us in the challenge.  To give you further inspirations, have a look at the fabulous cards and projects that my DT teamates have created HERE

My project is a gift purse (or box) that will hold only one cupcake (or muffin).  Yeah, I hear you...one isn't going to be enough for me either...LOL. 
Inside is a cupcake holder that will prevent the cupcake from being shifted around. 


Once you put the cupcake inside, the two side flap can be brought together and locked in place.  I made the resulting arch high enough so that if you have icing on your cupcake, it will remain untouched...hopefully that is, LOL.  I know, I know...my cupcake is fake...I meant if you have a real cupcake...haa haa.  


And on another note, I thought it would be quicker to make the fake cupcake, but as it turned out it would have taken less time to bake real ones and I would have ended up with some goodies to eat too...sigh.  

Moving on...
To close the purse, the front and back panels are brought together and there's a little tab to lock them in place. 


This sweet looking gal is called Tilda With Lovely Lace Shoes from Magnolia's Sweet Crazy Love Collection 2012.  I've used my Letraset Promarkers and Trias markers to colour the images for this project. 


The two side panels are similarly decorated with exquisite-looking die cuts made from a Memory Box die called Flowering Christmas Tree


On the back panel I have put another Tilda.  She is from an older Magnolia collection Yummy for Your Tummy Collection 2009 and she is called Kitchen Tilda


Both Magnolia images are available from Diana's on-line store Magnolia-licious.  Diana has an excellent selection of both full-size and mini-size stamps.  Check out also the die selections that she has also.  The one I have used here was from her store also.  The Memory Box and PoppyStamps dies are soooo... gorgeous.  They are to die for...LOL.


Challenges I am entered with this project:

Magnolia Down Under Challenge #143 - Anything But A Card
I ♥ ProMarkers Challenge #113 - Let's Go Shopping
Joanna Sheen Challenge - Someone Special
7 Kids College Fund Challenge #45 - Die Cuts/Punches
Just Magnolia and hAnglar & sTanglar Challenge #153 - Soft Spring Shades
Fussy and Fancy Friday Challenge 61 - Punches & Dies 
Simply Magnolia - Use at least 2 Magnolia stamps
Divas By Design Challenge #31 - Anything But a Card
Charisma Cardz Challenge #15 - Shabby Chic

That's all for now.  Thanks so much for taking the time to drop by.  I appreciate your visit.   Have a wonderful week! 

***EDIT***I have made a tutorial for this gift purse/box HERE if you're interested.


Materials and Tools Used:

Cardstock:  American Craft 80lb cover

Stamps (other than mentioned above):  JustRite 'Just for You'

Dies:  Spellbinders Fleur De Lis Squares, Grommet Tags, Classic Ovals and Classic Scalloped Ovals; Memory Box Flowering Christmas Tree; Crealis Creative Flowers CL CF 18

Punches:  EK Success medium Retro Flower and small Leaf; Martha Stewart Hydrangea petals; Punch Bunch medium Leaf

Miscellaneous:  Tim Holtz distress ink stamp pad Walnut Stain; pearls from my stash

Medium:  Letraset Promarkers and Tria markers

Paper to colour images on:  Bee Company Artist Marker Pad 


Friday, April 20, 2012

A Magical Birthday Criss Cross Card

Hello.  

I finally have a card to show you.  Here's a criss cross card I've made.  


I love this Tilda.  I bought her because my nieces are Harry Potter fans (me too...LOL), so I thought I would use her when I have to make a card for them--I thought they would like that.  So...she is called Wizard Tilda.   


This image is part of Magnolia's Princes & Princesses Collection 2012.  The stamp can be purchased from Magnolia-licious, Diana's on-line store.  I've colored her with my Letraset Promarkers and Tria markers and used a few coloured pencils to add shadings.  


Inside the pocket of the criss cross card, I have made a card insert.  Oh yuk...the flowers look a bit orange in the pictures.  But in real life they really aren't--more like deep yellow to match the DP of the card insert.  


Full view of the card insert. 


This is Tilda Catching Stars from the same collection, also available from Magnolia-licious.  I've added glitter    glue to the stars and Tilda's crown.   


I am entering the following challenges with this card:

Colour Create - Challenge #94 Yellow, Blue & White
Sourthern Girls Challenge #42 - Fancy Folds
By the Cute & Girly Challenges - April Once Upon a Time
Midweek Magnolias Week #7 - Use 2 characters
My Mum's Craft Shop Challenge #53 - Favorite Song/Movie (Harry Potter movies)
Craft Your Passion Challenge #106 - Die Cuts & Punches
Crafty Cardmakers Challenge #66 - Fantasy
Stamptacular Sunday Challenge #159 - Freebie Week
Paper Sundaes Challenge #116 - Anything Goes
ABC DT Challenge - April Anything Goes

That's all for today.  Thanks so much for taking the time to drop by.  Have a wonderful day!


Material and Tools Used: 

DP's: ChatterBox Vacation Squares, Butter Dahlia and Guest Plaid; Hot Off the Press Joy's Vintage Paper 

Dies: Spellbinders Labels Twenty-Two; Magnolia Doohickey Swirl; PoppyStamps Gentle Leaf  

Punches: Martha Stewart edge punch and Rose Leaf; EK Success Retro Flower large and medium; Punch Bunch Leaf; Nellie Snellen extra large leaf embosser

Miscellaneous:  Tim Holtz distress ink stamp pad Walnut Stain, pearls and glitter from my stash


Related Posts Plugin for WordPress, Blogger...