Tuesday, July 30, 2013

Happy 60th, Danielle

Hello!

Just a reminder of the current challenge at the Magnolia-licious Challenge Blog.  The theme is 'Anything Goes'--which is probably just about everyone's favorite.  Not sure if it's mine though...tee hee.  Anyway you still have a bit of time left to join in the fun. Details can be found at the Magnolia-licious Challenge Blog.  Have a look also at the fabulous cards/projects of my DT teammates for inspirations.  This week it's Team B's turn to post their cards...and that means me!

This was the card that I made for my friend Danielle.  It was a milestone birthday so I wanted to make her something special.  Also, I had hoped to get it to her in time, but ahem...I was late with it.  (Sorry, Danielle!)


I drew some Zentangle patterns to make the figure 60.  (I'm really liking Zentangle, Diana!)  Would love to try to do more tangling if I can just find the time...LOL.

This is another easel card from me.  Tee hee...it's my fave type of cards, so there are lots of these on my blog.


I'm featuring a couple of adorable Magnolia images here:


Princess Pea Tilda from the Once Upon A Time Collection 2013
- Tilda Binding Flowers from the Special Moments Collection 2013

Magnolia-licious, Diana's on-line store is an excellent source for your Magnolia stamps.  Diana  carries a large selection of both the full size and mini stamps.  And if you don't see the particular one you are looking for, contact Diana and ask her if she can bring it in for you. 
Check out the selection of Wee Stamps by Sylvia Zet and newly introduced to the store are the wonderful Wild Rose Studio stamps.
Prices are discounted!  Along with excellent customer service, you get to earn 2% in-store credit of every order which you can apply to future purchases.  Sweet!

Hope you can join our 'Anything Goes' challenge.  You can win a terrific price.


Also a reminder that the comments you leave on the Magnolia-licious' and any/all of the DT gals' blogs will be entered into a draw for the Surprise Package Prize each week--only one comment per blog per post please, for ALL Mini Monday, Wee Wednesday and Challenge posts. Winners are posted on Wednesdays.


As for me, I am entering the following challenges with this card:
Divas By Design - Anything Goes
As You Like It Challenge #7 - Favorite Fancy Folds and Why (Easel cards are definitely by favorite type of cards as they can be put on display beautifully.)
Inky Impresssions Challenge #118 - Birthdays
Lady Anne's Challenges #10 - Anything Goes
Ladybug Crafts July Challenge - Favorite embellishments (handmade flowers and pearls)
Creative Creations Challenges #15 - Anything Goes
Stamp With Fun Challenge #217- Celebrate
Tuesday Throwdown #158 - Birthday Party
Addicted to Stamps and More Challenge #55 - Photo Inspirations
Charisma Cardz Challenge #29 - Make your own embellishments (handmade flowers)

Thanks for stopping by.  Your visit is always very much appreciated.  Enjoy your day!  Have a wonderful week.


Materials and Tools Used:
Sentiments:  Computer generated
DP's:  from Recollections Bold Basics paper pad
Dies:  Go Kreate XXL Frames Frilly #1; Spellbinders Labels Eighteen and Classic Ovals; Memory Box  98312 Fancy Blossoms; CC Designs Olive Branch; Cheery Lynn Designs Exotic Butterfly Mini DL112
Punches:  Nellie's Floral Punch Small Rose Flower FLP027; Martha Stewart Daisy Dot edge punch
Miscellaneous:  Ranger Tim Holtz Distress Ink stamp pads Walnut Stain, Broken China, Pine Needles and Rusty Hinge; Sakura Pigma Micron 01; pearls from my stash
Colouring Medium:  Letraset Promarkers and Pantone Trias

Sunday, July 28, 2013

Hellebores/Christmas Rose (Paper) Tutorial

Hello!

In response to interests on the paper hellebores/Christmas roses that I put on the Christmas card posted HERE, this is a tutorial on how to make them yourself. 


This tutorial is picture loaded.  Sorry I don't have a camcorder, sigh...so no video for you.  (And I've put this together very quickly, so I hope the step-by-steps make sense...tee hee.)

Materials and required:
- white cardstock (I used American Craft 80lb (216gr) cardstock)
- vanilla/cream coloured cardstock
- Ranger Distress Ink stamp pad Forest Moss and dabber
- water-filled spray bottle
- punches and dies as shown below
- 1/8" circle hand-punch
- embossing tools (large ball, small ball)
- scissor and glue

These are the punches and die that I used:
You do NOT have to use these ones exactly, just find punches/dies that will give you similar shapes and sizes.


For each flower you need the following number of punched pieces:
- 5 white petals
- 2 vanilla/cream stamens for the flower-centre outer layer
- 3 vanilla/cream cosmos for the flower-centre inner layers
- 1/2" green circle

Apply some Forest Moss ink on the lower parts of the white petals as shown. I used my dabber to apply the ink.  (You can make your own, it's easy!)

Spray some water on the white petals.  Not too wet--just damp enough for the green ink to start to spread.

Stack the petals together, one on top of another.

Squeeze the petals from the outside to the middle to create wrinkles.  I wrapped mine around the handle of my dabber/dauber to make it easier.  (You can do the petals one by one if it makes it easier for you.)

Spread out the petals--curl them slightly upward--and let dry.

Take your half-inch green circle and punch out a hole in the centre using your 1/8" hand punch

Once the petals are dry, clip off the small ends of the petals as shown.

Apply glue to the small green circle and adhere the petals in place as shown.

Glue the 2 punched stamen pieces together as shown, offsetting the fingers or whatever you call them.
 
 
Using an embossing tool and embossing pad (mine is a mouse pad), cup the punched stamen pieces.

For each of the cosmos, split each petal in three as shown.

Cup the cosmos pieces as shown...
- the first one, I used the larger-ball embossing tool
- the second, I used the smaller-ball embossing tool (to make a tighter cup)
- the third, I actually just fold the flower in half and then fold it again in half

Glue the pieces together as shown to form the flower centre.

Adhere the flower centre to the white petals in place as shown. 

I happen to have this leaf die in my stash that I thought would be perfect--it's one of the leaves in a Cheery Lynn Tropical Leaves set B119.  You can also probably find something similar in your own die collection.

Voila!  There you go!
 
 
Hmm...the flower looks a bit ragged...LOL.  But like I said, I did do this tutorial very quickly.  Have fun!
 
Edited Sep. 21/13:  I've done another set of flowers and I've added dots to the petals using a Promarker marker fitted with an ultra-fine tip. 


Friday, July 26, 2013

Sweet Wishes for Debbie - FFFC #94

Hello! Happy Friday!

It's a new challenge at Fussy and Fancy Friday Challenge Blog.  And this time, woo-hoo...it's my turn to host it.  For the theme, I've chosen...More Than One Fold or Fancy Folds (e.g. gate-fold cards, tri-shutter cards, side-step cards, stair-step cards, diamond-fold cards, etc.).  I just love the not-so-ordinary cards and I'm hoping I'll get to see a type of folds that I haven't seen before and I get something new to play around with...LOL.  Anyway, for more details on the challenge and how to join in the fun, hop over to Fussy and Fancy Friday Challenge. Have a look at the fabulous cards that my DT teammates have created for inspirations. 

For my DT card, I am showing you this birthday card that I made for my friend Debbie down under in Aussie land--hope she liked it.  This first view is of just the card front when the card is all folded up.

 
When opened it's a type of a tri-shutter card.    


It's not of the more popular basic tri-shutter card.  This one has different cuts and folds giving me a full panel for the card front. 

I am featuring a couple of adorable Tilda images from Magnolia:


- Tilda With Little Pocket from the With Love Collection 2013
- Tilda With Love from the With Love Collection 2013

Diana's on-line store, Magnolia-licous, is an excellent source for your Magnolia stamps.  Diana carries a large selection of both the full size and mini stamps.  And if you don't see the particular one you are looking for, contact Diana and ask her if she can bring it in for you. 
Check out the selection of Wee Stamps by Sylvia Zet, and Wild Rose Studio stamps.
Prices are discounted.  Along with excellent customer service, you get to earn 2% in-store credit of every order which you can apply to future purchases.  Sweet!

Challenges for this card:
A Little Bit Crafty July Challenge - "Die-ing" for it!
Stamp With Fun Challenge 217 - Celebrate
Totally Tilda Challenge #76 - Titian Tilda (Tilda with Little Pocket)
Creative Fingers Challenge #2 - Anything Goes
Seize the Birthday - Anything Goes Birthday
Bearly Mine Challenges #96 - Anything Goes
Papertake Weekly - Die-ing for a Punch
Crafts and Me Challenge #139 - Anything Goes
Charisma Cardz Challenge #29 - Make your own embellishments (handmade flowers)


Thanks for stopping by.  I very much appreciate your visit.  Have a fabulous weekend.  Stay safe!


These are the measurements that I used for the card. 
PDF Template HERE if you're interested and want a printout.

Materials and Tools Used:
Sentiment Stamps:  Hero Arts "Sweet Wishes"; Inkadinkado "Have a Great Birthday"
DP:  One DP from Recollections Habitat paper pad
Dies:  Go Kreate Small Frames Frilly Square #10; Memory Box 98222 Fauntleroy Crest; Cheery Lynn Exotic Butterfly Mini DL112 and Small Angel Wing DL112A
Punches:  EK Success Retro Flower large, medium and small; Michaels mini sun; Carla Crafts small Cosmos
Miscellaneous:  Ranger Tim Holtz Distress Ink stamp pad Walnut Stain; pearls from my stash
Colouring Medium:  Letraset Promarkers and Pantone Trias

Wednesday, July 24, 2013

Christmas Roses

Hello!

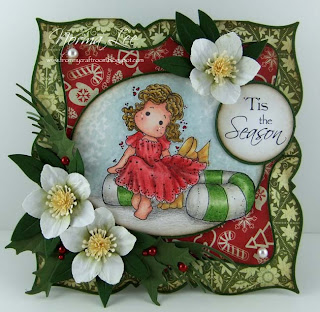
Woo-hoo...I've managed to add another card to my Christmas card collection for this year.  I think I'm averaging one Christmas card per month--LOL, I think that's just pitiful!  I really have to do better.  Anyway here's my Christmas-In-July card.
 

I just love hellebores--commonly known as Christmas Rose.  They come in a variety of colours, but the white ones are my favorite.  So I've tried to recreate them in paper--I think I came close, don't you think?
Edited: I've now done a tutorial on the paper hellebores/Christmas Rose which you can find HERE if interested.

I've turned this into an easel card...


I've used a couple Magnolia images here and have used my coloured pencils to do the colouring.


- Delightful Tilda from the Special Moments Collection 2013
- Peppermint from the Merry Little Christmas Collection 2013

These 2 stamps and other Magnolia images, both full-size and mini, are available from Magnolia-licious on-line store.  If you don't see the particular one you are looking for, contact Diana and ask her if she can bring it in for you.
The Sea Breeze Collection 2013, Magnolia's newest stamp collection, are in the store now.
Check out also the selection of wonderful Wee Stamps by Sylvia Zet and newly introduced to the store are the cute Wild Rose Studio stamps.
Prices are discounted!  Along with excellent customer service, you get to earn 2% in-store credit of every order which you can apply to future purchases.  Cool!


Challenges for this card:
As You Like It Challenge #6 - Your favorite special occasion and why (it's Christmas of course and I love the festive feeling everywhere you go)
Charisma Cardz Challenge #28 - Girly
Paper Crafting Journey - Christmas in July
Christmas Stampin' All Year Long Challenge #25 - Paper Crafting Techniques (easel card)
Creative Fingers Challenge #2 - Anything Goes
Sweet Stampin' - Christmas in July
Addicted to Stamps Challenge #60 - Lots of Layers
Papertake Weekly - Die-ing For A Punch
Bearly Mine Challenges #96 - Anything Goes
Marianne Design Divas - Layer it up! (Flower Doily LR0129, Leaves LR0192)

That's all for now.  Thanks so much for dropping by.  I really appreciate your visit. Enjoy your day and have a wonderful week!


Materials and Tools Used:
Sentiments:  Computer generated
DP's: Basic Grey hello luscious thrive; Recollections
Dies: Go Kreate XXL Square Frames Frilly #4 and #7; Spellbinders Standard Circles; Memory Box 98316 Cherry Blossom (for the flower centres); Cheery Lynn Designs B119 Tropical Leaves; Marianne Design Creatables Flower Doily LR0129 and Leaves LR0192 ; Tim Holtz Festive Greenery
Punches: Punch Bunch Medium Impatiens; Carla Crafts Small Cosmos (for the flower centres)
Miscellaneous: Colluzle Oval template; Ranger Tim Holtz Distress Ink stamp pads Walnut Stain and Forest Moss; pearls from my stash
Colouring Medium:  Coloured pencils--Faber-Castell Polychromos and Art Grips, Prismacolor Premiers


Tuesday, July 16, 2013

Hooked on this feeling...

Hello!

Sorry I haven't posted anything here for a while now, but you know...sometimes life gets in the way...LOL.  But I have not been exactly idle in my craft room.  I have been working on a few birthday cards.  I just can't show them to you yet until the friends I was making the cards for have received them.  And of course I was also working on the card below--this I can show you now...tee hee.

This is a midway reminder by the way--we're halfway into our current challenge at the Magnolia-licious Challenge Blog.  The theme is...Some like it HOT.  You have another week to get your entries in.  Visit the challenge blog HERE to get more details on the challenge and how to join in the fun.

And if you need inspirations, check out the fabulous cards/projects of my DT teammates--Team A was posted last week HERE and Team B is being posted today HERE

 Here's the card that I came up with...


Is this scene cute or what...LOL.  Can you see the fish hook in Tilda's dress?  I used a piece of beading wire and twisted it into shape for the fish hook.   

I was hoping that I could show newer images from Magnolia's latest stamp collection, but I don't have any yet...rats! so these adorable images I'm featuring are from past collections.


- Hooked Tilda from the Summer Memories Collection 2012
- Fence and Summer Background from the Summer and Sea Collection 2008
- Waterlily Tilda from the Summer Memories Collection 2012

Magnolia-licious, Diana's on-line store is an excellent source for your Magnolia stamps.  Diana  carries a large selection of both the full size and mini stamps.  And if you don't see the particular one you are looking for, contact Diana and ask her if she can bring it in for you. 
Check out the selection of Wee Stamps by Sylvia Zet and newly introduced to the store are the wonderful Wild Rose Studio stamps.
Prices are discounted!  Along with excellent customer service, you get to earn 2% in-store credit of every order which you can apply to future purchases.  Sweet!


Challenges for this card:
Stempelsonne Challenge #93 - Summer
Wags 'n Whiskers Challenge 108 - Summer Fun
Sister Act Card Challenge #15 - Anything Goes
QKR Stampede Challenge #47 - Let's Go Fishing
Polkadoodles Challenge Week 28 - Summer Fun
Creative Fingers Challenge #2 - Anything Goes
Creative Card Crew Challenge #40 - The Great Outdoors
Inky Chicks Challenge #8 - Masking (Hooked Tilda was masked when stamping the Fence Background)
A Creative Romance Challenge #3 - Ribbon or Twine (twine for the fishing line)
A Little Bit Crafty July Challenge - "Die-ing" For It!

Thanks so much for stopping by.  I very much appreciate your visit.  Enjoy your day and have a wonderful week. 


Materials and Tools Used:
Sentiments:  Computer generated
DP:  Sandylion Kelly Panacci Around the Corner
Dies:  Spellbinders Standard Circles, Classic Ovals and Fantastic Flourish Two; Crealies Creative Flowers No.02 ; La La Land Crafts Waterlily
Punches:  EK Success large and medium Retro Flowers; Nellie's Floral Punch Extra Large Leaf LFP011, Large Rose Leaf FLP031 and Small Rose Flower FLP027
Miscellaneous:  Ranger Tim Holtz Distress Ink stamp pads Walnut Stain, Wild Honey and Aged Mahogany; pearls, beading wire (for the fish hook) and twine from my stash
Colouring Medium:  Letraset Promarkers and Pantone Trias
Related Posts Plugin for WordPress, Blogger...