Wednesday, April 04, 2012

Another Secret Box

Hello!
I finally finished the secret box that I was working on for my tutorial.  See my precious posting below or click HERE if you're interested.  You can make this for any occasion and fill it with other goodies, but I made this one to fill with Easter eggs.  

front view
  

rear view


So.....I don't actually have much to say here except to show you more pictures...LOL. Here are frontal views of the different panels...

Hmm...I don't really like the way I colour her outfit in purple.  I think she would look better in a more softer colour--must try again.  Anyway this is Tilda with Floating Hearts from Magnolia's new Princes & Princesses Collection 2012.

This Tilda with Hollebores is from the previous collection Sweet Christmas Collection 2011. 

This is another image from the Princes & Princesses Collection 2012.  She is called Sweet Princess Tilda.

All these Magnolia images and many more are available at Magnolia-licious, Diana's on-line store. She has a fabulous inventory of the full-size as well as the mini stamps.  Also don't overlook the selections of dies and other crafting tools.   


Of course, what would I do without flowers...LOL.  They are one of my favorite types of embellishments.  This same floral arrangement is on the 2 sides of the box that don't have a Tilda on it.

Challenges that I can enter this project into:
Totally Tilda Challenge #43 - Tilda holding a flower/bunch of flowers
Paper Sundaes Challenge #114 - Easter
Hooked on Craft Challenges #19 - Easter
Deep Ocean Challenge #22 - Masking or use more than one stamp
Creative Craft Challenges - Anything BUT a Card
Everybody-Art-Challenge #187 - Easter
Papertake Weekly Challenge - Anything Goes
I  Promarkers Challenge #111 - Springtime
Simon Says Stamps! Challenge - Use your favorite tool (Big Shot machine & dies and punches)
Just Magnolia hAnglar & sTanglar Week 150 - Springtime
ABC DT Challenge - Anything Goes

That's all for now.  Thanks for taking the time to drop by.  So much appreciating your visit.  Enjoy your day and have a wonderful week.


Materials and Tools Used:

DP's:  Anna Griffin paper; from Recollections Believe paper pad

Dies:  Spellbinders Labels Ten, Petite Scalloped Circles, Standard Circles, Petite Ovals and Rose Creations; Cheery Lynn Olive Branch

Punches:  Martha Stewart pine branch and daisy; McGill daisy; EK Success small retro flower; Nellie Snellen extra large leaf and rose leaves jumbo; Fiskar Celestial 3-corner punch; Michaels tiny sun 

Miscellaneous:  Tim Holtz distress ink stamp pad Walnut Stain; ribbon, pearls and glitter from my stash

Medium:  Letraset Promarker and Tria markers

Monday, April 02, 2012

Secret (3-Tier) Box Tutorial (4 1/2" high)

Hello!
This is a tutorial on how to make a 'secret box' like the one I made in a previous posting here.


Before I start on this tutorial, I have to give credit where credit is due and state that I did not design this box.  The credit goes to Heather Perreaux who created the concept for this box.  I found her tutorial for a 3-inch cube secret box that she has done for Splitcoaststampers here.  She has step-by-step instructions and also a video.

I needed a taller box to put larger images (of my fave Magnolia stamps) and taller trays for the larger Lindt Easter eggs (yum yum).  So I have hightened the box 1 1/2 times to 4 1/2 inches high.

Materials
What you need for the box are 5 pieces of cardstock:

one - 6 inches x 10 1/2 inches  (15.2 cm x 26.6 cm)
one - 7 inches x 10 1/2 inches  (17.7 cm x 26.6 cm)
three - 5 5/8 inches x 5 5/8 inches  (14.3 cm x 14.3 cm)


My templates turned out to be quite a bit different than Heather's.  Here are the templates for the 4 1/2" high secret box...

right side of the box


left side of the box


tray


If you have a knack at interpreting templates, then you can ignore the rest of the posting.  However if you need step by step instructions, then keep on going...LOL.  Warning--there are LOTS of pictures!

Step 1 - Place the 6" x 10 1/2" cardstock on your scoreboard with the short side along the top and score at 3".


Step 2 - Rotate the cardstock so the long side is along the top and score at 3" and 7 1/2".

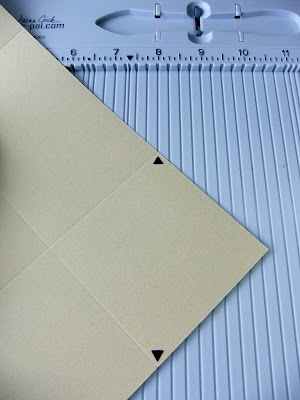
Step 3 - At one corner of the cardstock, score diagonally by lining up the corners (indicated by black arrows below) along one of the inch grid line on your scoreboard.

Step 4 - Score also at 1" away from the first scoreline.  Do the same scorelines on the other corner of the cardstock at the same long side of the paper (indicated by the black arrows below). 

Step 5 - Trim off the small corner triangle. Both corners. 

Step 6 - Cut along the horizontal scoreline from the left vertical scoreline to the left side of the paper, and from the right vertical scoreline to the right side of the paper.   (Refer to template.)

Step 7 - Cut diagonally at the corners that are unscored as show below.

Step 8 - Your cardstock should look like this now.

Step 9 - Valley fold along the scorelines.

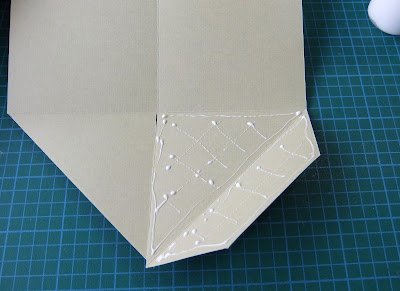
Step 10 - Apply glue all over the corner piece that has the flap as show below.

Step 11 - Tuck the opposite triangle in to form a corner.

Step 12 - Fold the flap up and over.  

Step 13 - Do the same to the other end.  You now have one side of a box.

Step 14 - Place the 7" x 10 1/2" cardstock on your scoreboard with the short side along the top and score at 3" and 6".  That extra 1" of paper is for the connecting flap.

Step 15 - With this piece of cardstock do the same Step 2 to Step 7 above.


Step 16 - An extra cut line is required with this cardstock to trim off the corner to form the connecting flap.

Step 17 - This cardstock should look like this now. 

Step 18 - Glue the same way as above --Step 10 to Step 12. Now you have the other side of the box. 

Step 19 - Apply glue on the connecting flap as show below. 

Step 20 - Attach the two side together

And there you have your box!

Step 21 - Take your 5 5/8" x 5 5/8" cardstock and place the left edge of the paper along the 3/4" scoreline on the Scor-Pal scoreboard.  Score at 2 1/8" and 5".

Step 22 -  Rotate the cardstock 90 degrees and do the same scoring lines.

Step 23 - Refer to template and cut along solid lines.

Step 24 - Fold along scorelines and apply glue as shown below. 

Step 25 - Attach the sides together to form your tray.

Step 26 - For placement of the bottom tray inside the box, apply glue as shown below--to 2 sides of the tray and to the bottom of one side of the box.

Step 27 - For placement of the top and middle trays, apply glue to 2 sides of each tray as shown below

And there you have your completed secret box.


And then you can decorate your box any way you want.  I am not quite finished with mine...LOL.  It'll take me another day to do that.  I'll edit and show the finished product when I'm done.


Edited
Here's the finished project!


Hope this tutorial will be of some use to some of you.  Happy crafting!!!

Sunday, April 01, 2012

Winner of my '3rd Blogoversary Candy'

Hello!  Happy Sunday and Happy April.

It's time to announce the winner to my 3rd Blogavery Candy.  This is what the winner will be getting...


I have made a draw using the Random.Org's True Random Number Generator, but me being a computer dummy I can't figure out how to put a picture of the result in this posting.  (I go through this every year, spend hours trying to figure out and then gave up...LOL.)

Anyway, the number generated is 133, so congratulations to:


Jules, please e-mail me your mailing address--snail mail...LOL (link to my e-mail address is near the top of my left side bar).  Put "Blog Candy Winner" in the subject line, please. 

If I do not here from Jules by next Sunday, April 8/12, I will make another draw on the following Monday.  

Thanks to all who participated.
Bye for now.


Related Posts Plugin for WordPress, Blogger...